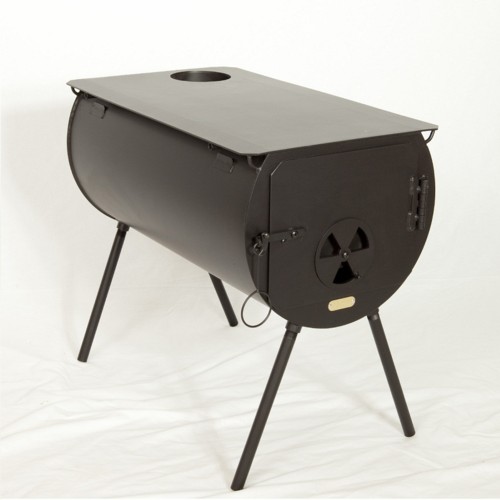
Small portable wood stove for camping. [Source]
Let's Adore Jesus-Eucharist! | Home >> Varia >> Bachelor's Kit

Small portable wood stove for camping.
[Source]
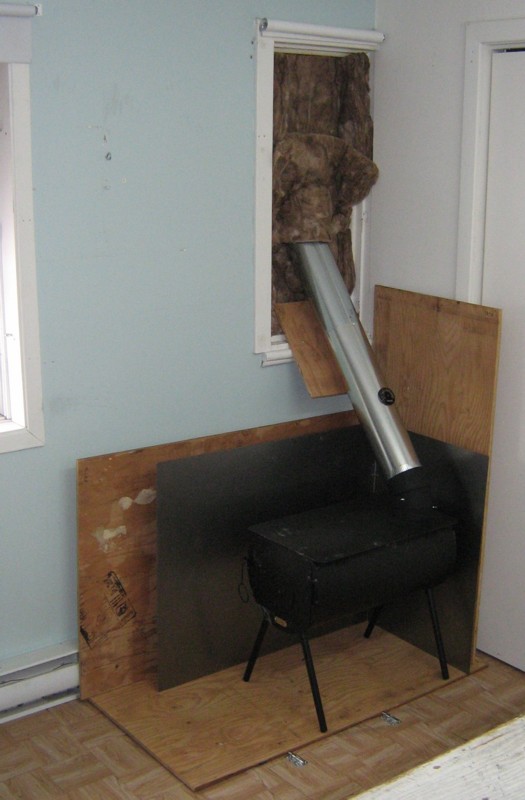
Portable wood stove inside house, with chimney exiting window.
(After this picture, I added another steel plate to cover the plywood on the floor.)
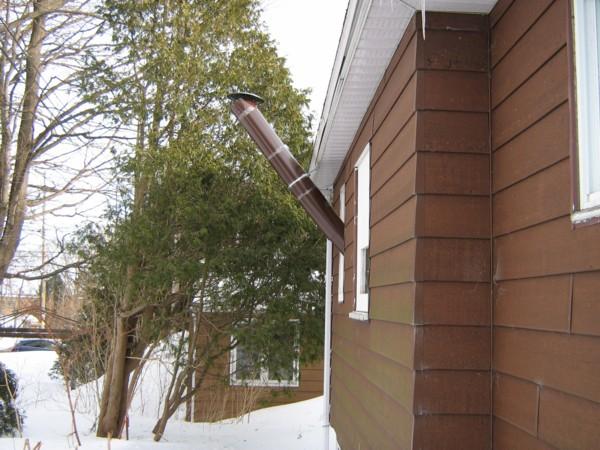
Chimney seen from outside.
1) Introduction: Important disclaimers
2) Justification
3) Requirements
4) Exploration of the design space
5) Construction
6) Setup
7) Operation
8) Disassembly
9) Questions
10) Mistakes
11) My dream chimney
12) My dream stove
Please read the following disclaimers, as well as Legal Consideration #18, and also this whole article, before doing something deadly stupid. First, anytime you burn anything inside a confined space, there is the risk of carbon monoxide poisoning. See the disclaimer in
Emergency Operation Of A Portable Generator Inside Your House
Second, for a wood stove, there is also the risk of fire, since most houses are made of combustible materials (wood, plastic, asphalt shingles, etc.) and wood stoves and their chimneys get dangerously hot, and can produce sparks.
Third, wood stoves must be installed by licensed professionals, using only components that have been officially approved by testing laboratories. This article discusses a temporary installation, that would only be used during a major disaster, not an official installation that your insurance company would approve of!
Fourth, because this article is such a long "How To" for such a simple topic (wood stoves), you first need some instructions on how to read this long article:
See Appendix 3 of Emergency Operation Of A Portable Generator Inside Your House
Wood stoves all have the basic requirement of maintaining a high-temperature chemical reaction used to provide heat, while preventing the spread of this fire to the surrounding objects, and channeling all toxic emissions safely outside.
The reason this stove is different is that it must respect the Cardinal Rule of disaster preparedness, i.e. it needs to be mobile. In order to be mobile, it must satisfy additional requirements:
3.1) Compactness when stored and transported. A rough quantification of this critical attribute is "everything except the firewood must fit inside the closed trunk of an average-sized car".
3.2) Ease of transportation. No single component may be too large or heavy to be carried by hand for at least a kilometer by one healthy adult. This is not to say hand-carrying is the preferred option! Just that we want to eliminate standard cast-iron wood stoves which are painfully difficult to move.
3.3) Speed and ease of setup and takedown. Ideally, setting this stove up would be as quick and easy as making a bacon sarnie, but we have to be realistic. Let's say under two hours for an inexperienced adult with average mechanical skills, for a prepared location. For a new location (where this stove has never been installed), double that.
There are also "non-requirements", or rather relaxed requirements, since this wood stove is only intended for emergencies and not for the normal winter-long heating of a home. In other words, it might never be used (if we are lucky!), or if it's used, it would normally be only for a few weeks (here again, if we are not too unlucky!).
3.4) Pollution. Ideally, this stove would emit as few particulates and toxic fumes as the best EPA-rated wood stoves. But since it's only for emergencies, the fact it might pollute more than what is normally legal for a wood stove doesn't matter very much.
3.5) Heating capacity. The usage scenario for this wood stove is not to heat a large house 8 months a year, but rather to keep comfortable a group of people crammed together in one room, when outside temperatures are far below freezing. So a stove that would normally have a totally inadequate heating capacity becomes acceptable.
I try to order design decisions in decreasing order of importance. Also, this was written after I managed to get a working setup, so many design dead-ends get mentioned only briefly (even though I plowed plenty of time and money finding out they were dead-ends!).
4.1) Wood stove: buy or build? There is a bewildering variety of wood stoves availabe on the market. Moreover, there is also plenty of free information on how to design your own wood stove (for example, "Wood Stoves: How to Make and Use Them" by Ole Wik, Alaska Northwest Books, 1977). Not only that, but inventing wood stoves is fun, and building them is not that difficult. Except at some point in time I have to get on with my life. So I just bought the least bad existing camping wood stove I could find, the "Hunter" from www.cylinderstoves.com (see picture at top of this article). At 42 pounds, it can still be carried for short distances, while being solid enough for serious use. All of the other camping wood stoves I found on the Internet were much lighter (i.e. easier to transport, but more fragile and less safe).
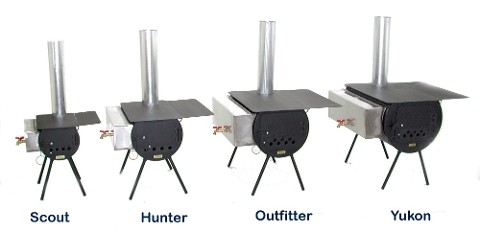
The complete range of camping stoves from Cylinder Stoves.
[Source]
There are other sizes of stoves as well as accessories available from the same company. The "Hunter" size might be a tiny bit big for my purposes, but I think the "Scout" is too small. The "Warming Tray" accessory seems a good idea for inside a tent, but inside a house you have plenty of tables. The "Water Heater" seems very easy to replace with a large saucepan on the stove, which is also much less prone to leaks. The "Coal Grate" and "Wood Pellet Burner Kit" were useless to me, since I didn't plan to use those fuels. I did get the "Stovepipe Damper" but it didn't work (too much air gets by, so it doesn't dampen the flow), and the stove seemed to work just fine without it. I also got the "Spark Arrestor" which I modified and do use. The "Nesting Stovepipes" are essential. They make it possible to have a chimney that is compact when stored.
4.2) Chimney: buy or build? All of the ready-made wood stove chimneys I could find were superb, safe, solid, approved by various official agencies, and not that expensive. Their common problems were:
- Bulky and heavy. A ten foot insulated stainless steel
chimney simply doesn't fit inside my appartment, on top of being painfully
heavy and difficult to move around. The weight also means a temporary
installation must be much more solid.
- Large inner diameter. Chimneys you can buy in stores are made for
normal wood stoves, used to heat the whole house all winter. So they have
excessively large internal diameters for a camping stove.
So I decided to start with the "Nesting Stovepipe" that came with my wood stove, and try to modify that to make it acceptable.
4.3) Chimney: How to make it exit the house? What worried me the most was making the chimney go out of the house. Permanent installations are easy: just put a big hole in the wall or the roof, and there are factory-made and government-approved fittings to seal the joint between the chimney and the house. But I wanted a temporary setup, and I wanted to be able to change the location of the stove easily. So digging a hole in the house was out of the question.
The only choice I had for a temporary installation was to exit through a window. After that, I had to decide "diagonal" or "90-degree turns". In other words, should the stovepipe go straight up out of the stove, turn 90-degrees toward the window, then once out the window take another 90-degree turn up toward the sky? Or just use two 45-degree elbows, one at the stove and one at the chimney cap? I chose the diagonal approach, to try to minimize flow restrictions (the harder it is for the smoke to leave the house, the higher the probability of insufficient draft causing carbon monoxyde poisoning), but also for the greater solidity. I was afraid the 10-foot chimney that came with the stove would not provide enough draft when angled at 45 degrees, but apparently it does.
4.4) Chimney: How to support it once out of the house? I designed and built an elaborate chimney support with pre-perforated telescoping angle irons held with bolts and wingnuts, in a double perpendicular triangle configuration (one to provide side-to-side stability, the other for up-and-down stability). After spending lots of time and money designing and building it, I set it up late one evening, and inserted the chimney. The next morning, I took my ladder outside to go verify something, and noticed the chimney wasn't even touching my fancy support... I think the plywood window panel and the stove itself provide sufficient stability (for an emergency setup). I added a roof ledge hook just to be sure.
4.5) Chimney: Insulation? I ran one burn test without insulation on the chimney, and predictably it was really wet inside the stovepipe starting at the point where the stovepipe left the house. So I had to insulate. Insulation in a high-heat environment doesn't leave you many choices: you are basically limited to rocks (which don't burn), like asbestos or vermiculite or glass fibers. The cheapest, most easy to obtain and easiest to manipulate was ordinary fiberglass insulation.
4.6) Chimney: How to protect the insulation? To protect the insulation against rain and snow, I thought of wrapping the insulated chimney in high-heat silicone-coated fiberglass fabric (used as welding curtains, etc.), but it was too expensive and hard to get. So I just hand-made some nesting aluminum tubes, held with "pop-rivets", and joined by crimping one end of the tube with a special tool which turned out to be commonly available. This part turned out to be one of the easier steps. aluminum is very easy to work with, very forgiving.
4.7) Joint between the chimney and the house? Most windows let you remove the glass panes to clean or replace them, usually because the glass is held in some kind of detachable wood or aluminum frame. So I initially thought of cutting a panel of FRTW (Fire-Retardant Treated Wood) plywood to plug the window hole, and cut a hole in the FRTW panel big enough for the chimney, and seal the joint with a sheet of steel. After a few attempts, I decided to cut the FRTW panel in half, to make it easier to install, and to integrate the steel sheet with the part of the aluminum outer chimney that makes the joint between the exterior part of the chimney and the house. See below.
4.8) Protection of house against heat and sparks from stove? Since I wanted to be able to set the stove up in any window, and that I therefore needed some spare FRTW plywood that could be custom-cut for a new window in an emergency, I decided to use FRTW panels around the stove for protection. But since the current spot I use is so close to the walls (long story; I'm currently crammed in a small appartment, and that was the only window I could use; normally I would have put it farther away from the walls), I had to also add a steel sheet heat shield (I wanted all FRTW panels to remain cool to the touch in normal operation).
5.1) The stove itself. Nothing to do, except find a way to hold the first part of the stovepipe (the first 45-degree elbow, 5" diameter) to the stove, to prevent it from popping out of its hole in high winds. I just bent a couple brackets into a "J" shape and bolted them to the elbow, after hooking them under the part of the stovetop that is a kind of sleeve into which the stovepipe is inserted.
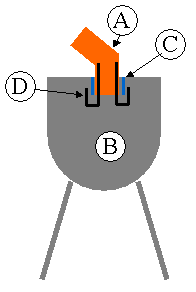
Connection between the stove and the first part of the stovepipe.
A) 45-degree elbow, first part of the stovepipe or chimney.
B) Stove proper, seen from the front.
C) Sleeve (part of the stove).
D) Homemade "J" bracket (outrageously not to scale; it's much
smaller in real life).
5.2) The inner chimney (actual stovepipe). Not much to do here. The purchased "Nesting Stovepipes" are fine. I added two screws per joint, to protect against the stovepipes separating in high winds. There are 5 sections, each 22" long, each of a slightly bigger diameter (starting at the stove end at 5", and ending at the chimney cap at 6"). See below for screwing error.
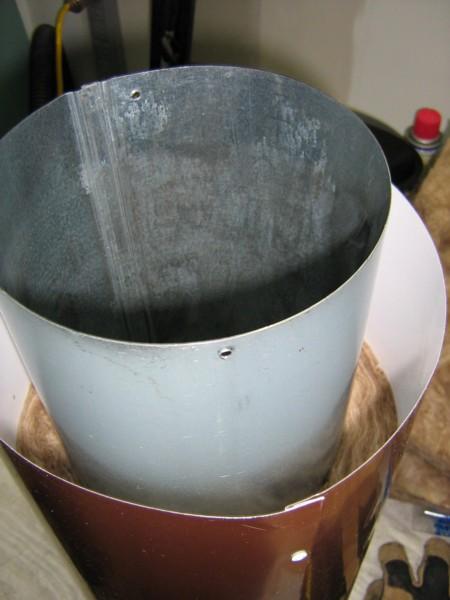
Steel inner stovepipe, fiberglass insulation, and aluminum outer tubing.
5.3) The aluminum outer chimney (insulation protection). I purchased a roll of aluminum, 20.5 inches wide and 10 feet long. It was in the roofing section of the store. I accidentally purchased a roll that was painted on both sides, with one side almost exactly the shade of brown of the outside of my appartment! I did appreciate having a chimney that didn't sparkle like the normal stainless-steel versions. In a SHTF situation, it's probably better not to show everybody you're nice and cosy and well-equipped. That roll also accidentally turned out to be just long enough.
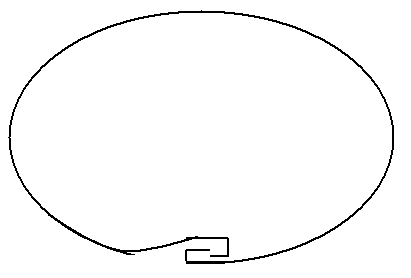
Making the aluminum tube seam.
The seams were easy to make. Just use two long pieces of steel held together with two bolts as a makeshift "bending vise", slide the aluminum sheet in between, making it stick out just 3/8", tighten, bend about 90 degrees by pushing it against the workbench top, remove the steel bars, and finish bending back that 3/8" edge. Repeat on other edge, but bending in the other direction. Form tube, hook both bends together, then lightly pound the seam tight with a hammer.
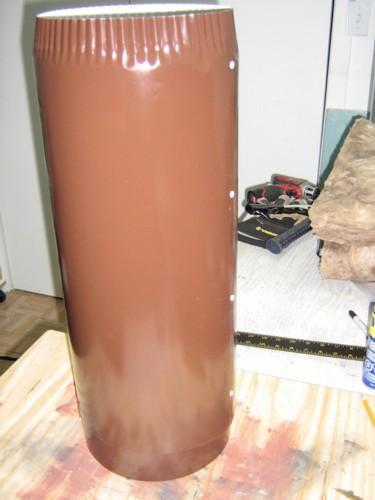
Two aluminum tube sections, nested. Notice pop-rivets and crimped end.
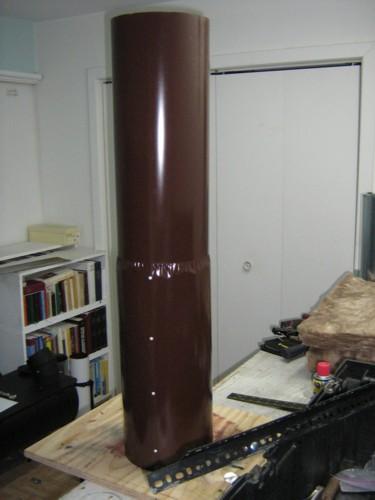
Two aluminum tube sections, assembled.
Add four pop-rivets per section. I used aluminum rivets, 3mm diameter, the shortest they had, with one washer on the "pop" side to make sure it didn't pull through. Don't place rivets too close to the ends of the tube, because when you assemble them, you don't want to one section to hit a rivet and be prevented from being inserted.
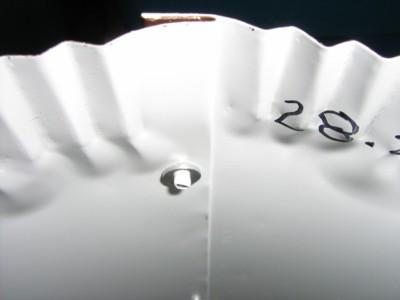
Closeup of aluminum tube seam.
Since you want to be able to nest them, make each section 3/8" of an inch less wide than the previous (I'm not talking about diameters here, but widths of the aluminum sheet before assembly). Since my chimney was about 10 feet total length, and I had about 4 feet inside the house and 6 outside, I ended up with three fixed sections of aluminum outer chimney, plus the mobile telescoping joint. Top section (toward chimney cap) 27.5" (this is total width, including the two 3/8" edges that are bent back to form the seam). Middle 27.875". Bottom 28.25". The aluminum sections have diameters increasing toward the stove, whereas the steel sections (for the actual inner stovepipe) have diameters that increase going toward the chimney cap. This sillyness is because you want the inner creosote-laden juices to stay inside the chimney as they trickle down, whereas you want the rain and molten snow to stay outside as the drops flow downward.
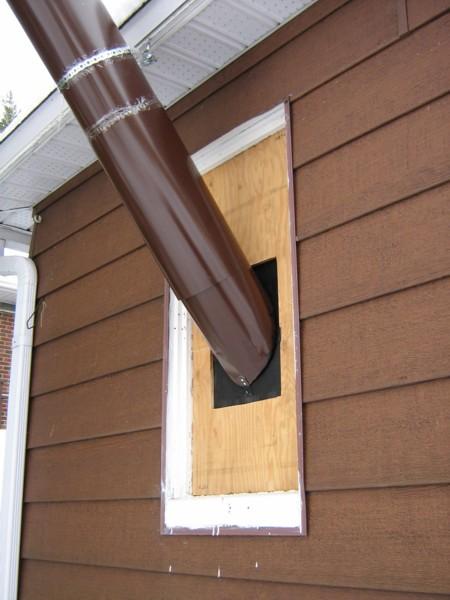
Telescoping outer chimney joint, final installation.
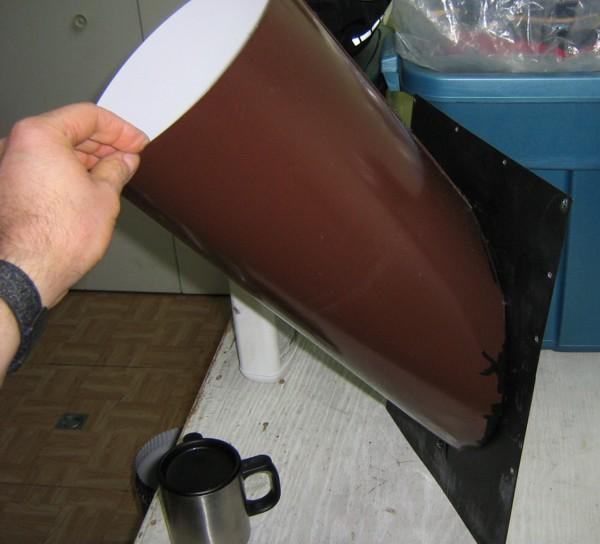
Outside view of telescoping outer chimney joint.
5.4) The "telescoping outer chimney joint". I don't how to call this part. It makes the joint between the aluminum outer chimney and the FRTW plywood window panel. I took a sheet of steel about 24 gauge thick, big enough to cover the 11x15 hole in the FRTW window panel, with about a half-inch of overlap all round. With a jigsaw I cut an ellipse (geometric intersection of tube and plane at 45 degrees), big enough to give about a half-inch of clearance with the inner stovepipe. (All these dimensions were calculated roughly, mostly by propping things up the way they were going to look like in the final setup, and eyeballing it.)
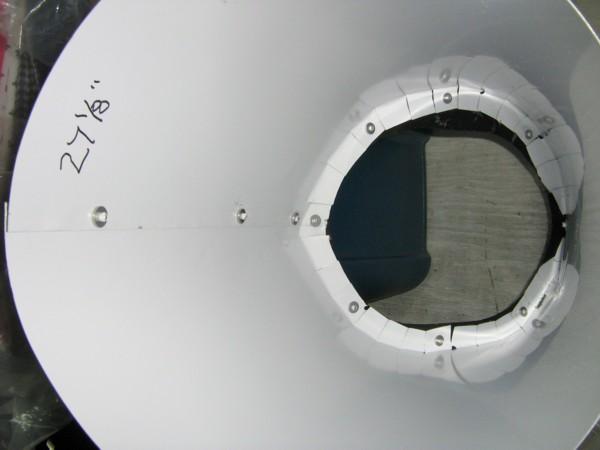
Inside view of telescoping outer chimney joint.
The joint between the aluminum tube and the steel plate is pretty shoddy: I just made many short cuts to the aluminum tube, and bent back the flaps, and somehow pop-riveted the two parts together. Ugly, not waterproof, but good enough for an emergency chimney. Since this part must telescope inside the fixed aluminum outer chimney, make the diameter smaller than the section it telescopes into. I probably should have used 27.875", but I made it a smaller diameter, because I thought the telescoping part would need to store nested inside the smallest aluminum section. It turns out it doesn't store well with the other sections, so you can just make it fit inside the bottom fixed section.
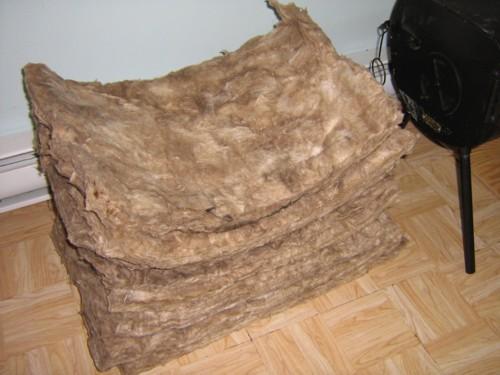
Fiberglass insulation half-batts.
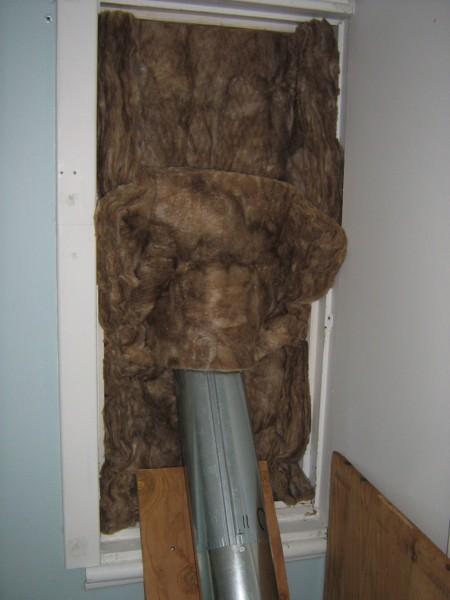
Inside view of Mickey-Mouse insulation of window panel.
5.5) Fiberglass insulation. Just four or five standard batts of fiberglass insulation (15 x 48 x 2.5"), cut in half (48" into two 24" lengths). A half-batt fits about right around a 5 to 6 inch diameter inner stovepipe. Accidentally, a half-batt also fits nicely in the window I use for the stove. I found out the hard way that sticking some insulation on that window, even any old way, keeps a lot of drafts and cold out.
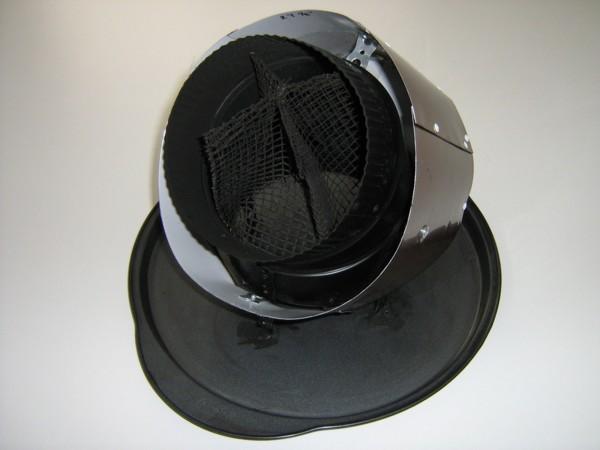
Chimney cap, seen from below. Notice spark arrestor, inner steel 45 degree elbow and outer aluminum.
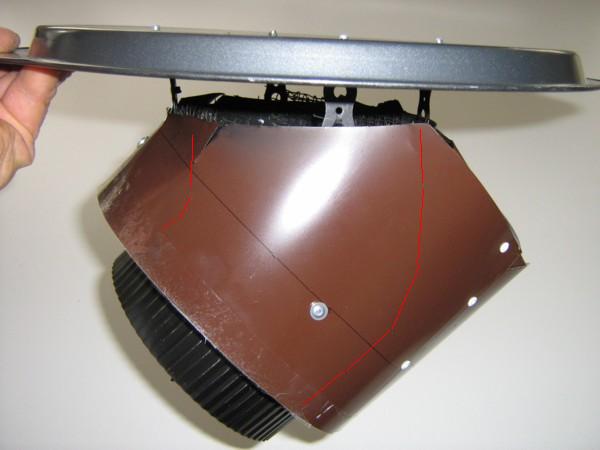
Chimney cap, side view. Red lines indicate position of inner steel elbow.
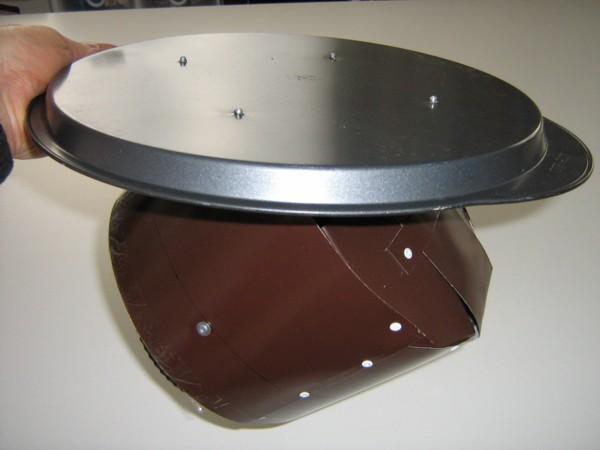
Chimney cap, sort of top view. The pizza dish looks offset, but it's
actually centered right above the opening of the 45-degree elbow.
5.6) The chimney cap. The chimney cap was the most complicated part to make. First I purchased two steel stovepipe 45-degree elbows, one 5" diameter for the stove end, the other a 6" diameter for the chimney cap (nesting steel stove pipes increase in diameter going out toward the chimney cap). Then, I bent the spark arrestor so it would fit inside the elbow, and pop riveted it around the rim of the top of the elbow. I used steel rivets for the inside steel parts of the chimney, and aluminum rivets for the outside aluminum liner parts, because the inside might get much hotter.
Then I bought a cheap pizza dish to prevent rain and snow from entering the chimney. The pizza dish is held to the inner 45-degree elbow with ordinary plumber's steel strap (everything pop-riveted). I didn't know how much clearance I should put between the pizza dish and the opening of the chimney, so I eyeballed it. Roughly an inch and a half, I guess.
The hard part was the aluminum outer chimney. It had to allow connection with the topmost aluminum tube section, prevent the aluminum outer chimney from sliding down, and prevent wind, snow and water from entering in between the steel inner stovepipe and the outer aluminum liner. I started with a ring of aluminum, held concentrically around the steel elbow, where the crimped end of the topmost aluminum tube section would be inserted. I held it with 4 short lengths of plumber's steel strapping. Then I used scraps of aluminum to somehow cover up the rest any old way. Here again, quite ugly, and a factory-made equivalent would look much better. But it works! ;-)
As far as securing together the aluminum tube sections, I first thought of using screws like for the inner steel stovepipe, but the aluminum is so fragile, and it doesn't get hot during operation (snow on the insulated chimney didn't melt even after hours of operation), so I just used tape. Here again, ugly, but it works. But do read about below about my taping error.
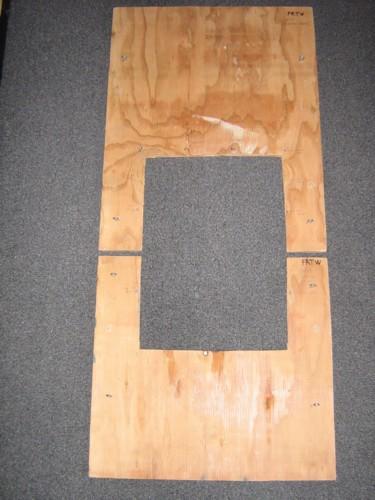
FRTW plywood window panel, split in half (8 eyelets for window hooks barely visible).
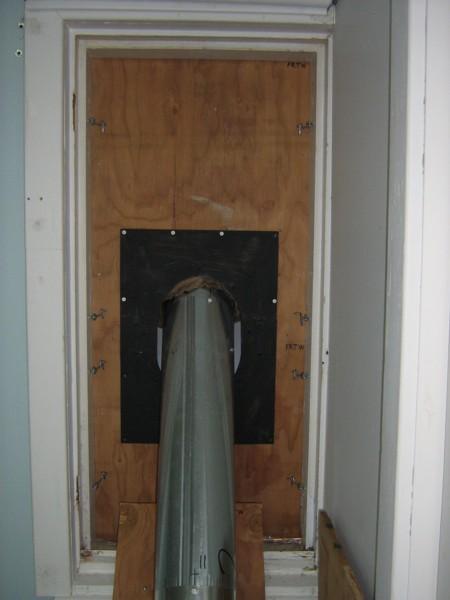
FRTW plywood window panel, installed, seen from the inside.
5.7) The FRTW window panel. FRTW plywood is about three times as expensive, and far fewer thicknesses are available (at least around here). I would have preferred 0.75" thick, but all I could get was 0.5", which was thin, but usable. I just cut it to size for my window, and put an 11x15" hole centered where the chimney would pass. The 15" dimension is the vertical one. To find where the 11x15 hole should be on the panel, just install the chimney without the panel, and measure.
I tried to leave enough distance between the hot stovepipe and the wood, but nothing is calculated scientifically, unfortunately. The panel is held to the window frame with simple hooks, four per half-panel. I used a permanent marker to write "FRTW" on both sides of all such pieces of plywood, since the fire-rating notice is only printed in one or two spots on the original 4x8 panel. See below for plywood thickness error.
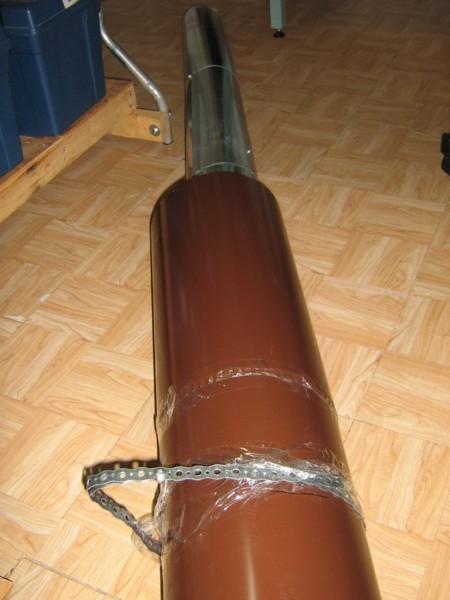
Strap to hold chimney to roof ledge.

Chimney hooked to roof ledge.
5.8) Chimney support strap. Nothing much here. Plumber's steel strap, bolted in a loop, taped about 6 feet away from the stove end of the chimney, hooked to a large threaded hook screwed into the roof ledge. The chimney is fully supported without it, but it makes installation much easier (see installation instructions below), on top of being additional security if something goes wrong with the window FRTW panel.
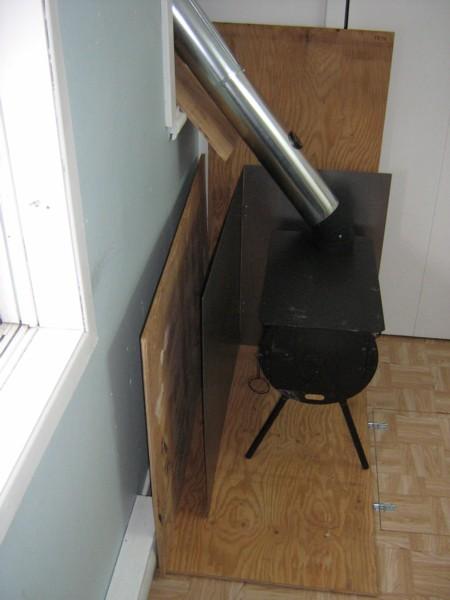
Heat shield, front view (and missing floor heat shield).
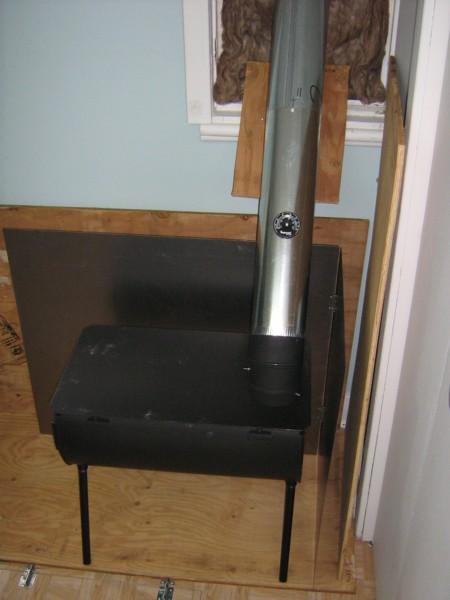
Heat shield, side view (and missing floor heat shield).
5.9) Steel heat shield. Just two panels of 20 gauge steel with pop-riveted hinges, because my current setup is far to close to the corner of the house. I just phoned up the local machine shop and they cut me two panels to size. I also need to add one for the floor.
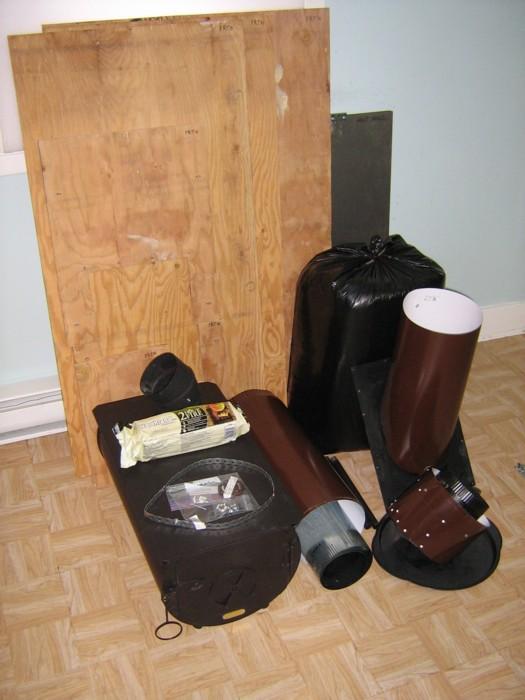
Complete kit, unassembled (in real life, many parts are in garbage bags to control foul odors).
I'm guessing an adult with no prior training, moderate practical skills and these instructions could setup the stove in less than 2 hours for a window that already has a pre-cut FRTW panel and roof hook for it.
If you cannot use your usual setup location (because, for example, a big tree has fallen on your house and you've moved all your emergency equipment to your neighbor's house), things will be more complicated, but doable.
6.1) Clear space for the setup. If you are like me, free space in your appartment is rare, so you'll have to move stuff out to make place for the stove. Remove combustibles like rugs, picture frames, curtains, etc. Remember you also need about 11x3 feet of floor space to assemble the chimney, and you have to be able to carry a long chimney from that floor space to the chimney window (in other words, if you have to turn a sharp corner in a narrow corridor with a big 10-foot long object, it won't work!) Check outside in case some flammable objects would be too close to the chimney (for example, maybe the last time you tried your chimney, a tree branch was much shorter and didn't come so close).
6.2) Go get the stove kit and make sure you have everything:
- Safety equipment, including large (17.5 pounds) multi-purpose dry
chemical fire extinguisher, at least two smoke detectors, at least
two carbon monoxide detectors (not the same thing as smoke detectors!),
hand-pressurized water sprayer to keep FRTW panels damp, plenty of
common sense and healthy fear and vigilance, etc.
- Stove, including 4 screw-on legs and first 45-degree elbow (which I
never disconnect from the stove).
- 5 nesting steel stovepipes.
- Chimney cap.
- 10-12 half-batts of fiberglass insulation (in garbage bag).
- 3 nesting aluminum outer chimney tubes.
- Telescoping outer chimney joint.
- 2 FRTW window panel halves (we assume it's already cut to size for the
appropriate window, and that 8 hooks are already screwed into the window
frame to hold the two halves).
- Metal heat shields. Normally one for floor, and one or two more if
you are close to one or two walls.
- Several FRTW plywood panels, as backup protection for walls, the floor, also
if your chimney comes close to the window frame, and also to be used as raw
material for different-sized FRTW window panel, should you need to change the
location of your setup.
- Various hardware: about two dozen sheet metal screws (Robertson #2 tip,
half-inch long, #8 size) to connect steel stovepipe tubes together, also
to connect telescoping outer chimney joint to FRTW window panel. Steel
strap to hook chimney to roof ledge. Magnetic stovepipe thermometer.
- Enough artificial logs to keep you warm during the emergency (easier said
than done!). See
below
for some calculations.
6.3) Assemble the steel stovepipes and chimney cap. Lay out all 5 nested steel stovepipe tubes on the floor (remember the smallest diameter is toward the stove, the largest diameter toward the window; in my setup they are numbered: #5 chimney cap end, #1 stove end). Screw them securely to avoid catastrophic separation during use (easier if you've avoided misaligning the screw holes). Use a screwdriver and not a power drill to avoid stripping the thin metal. Knee pads are nice if you're old like me and your knees hurt. Insert the flue damper (or not). Screw on the chimney cap.
6.4) Insulate the chimney. This is the messiest part, because the fiberglass insulation sheds little unhealthy particles. It's probably a good idea to wear gloves, a dust mask, and maybe even a raincoat. It's a lot easier to go shake off your raincoat outside, than change out of your normal cloths if you get fiberglass particles into them. Prepare the vacuum cleaner, or at least a wet rag, to pick up debris.
Gently take a half-batt of insulation, wrap it around the steel stovepipe as close to the chimney cap as you can, and gently slide the first (smallest diameter) aluminum tube over it. Slide the rest of the half-batts and aluminum tubes. Screw or tape all the aluminum tubes (I think tape is quite strong enough, but don't use the wrong kind). Slide in the telescoping outer chimney joint (that one has to remain mobile, so don't tape it). Measure 6 feet from the stove end, and tape the steel strap to hook chimney to roof ledge (make sure the "hooking" end of that strap points in the right direction, i.e. such that when the chimney is hooked, the chimney cap will point up, not sideways or down!).
6.5) Place FRTW panels, steel heat shields and the stove. Since we're assuming you're installing this in a location where you've tested it before, this should be easy. (My FRTW panels are pencil-marked with things like "Put this one against the outside wall", "Put this one against the closet wall", "Put this one on the floor, with the stove legs going here and here", etc.)
6.6) Hook the chimney in place. This part requires a bit of speed and agility if it's very cold outside, because you have to remove the window, and until you've finished installing the chimney, lots of very cold air will be blowing in (trust me, at minus 20 celcius, you want to do this part quickly). At least close the door of the stove room, to avoid making the rest of the appartment cold. You might want to put on Winter clothes. Make sure the FRTW window half-panels are ready. If it's nighttime, turn on your headlamp because you need to see the roof ledge hook. The telescoping outer chimney joint will try to slide down by itself when you lift up the chimney, so if nobody is there to help you, maybe a little bit of tape to hold it temporarily. (Finally, in my setup the stove is so close to the window wall that I have to wait before installing the vertical heat shields, so I can have place to put my foot.)
Take a deep breath and remove whatever is currently in the window frame (I use another panel made of thick ordinary plywood, with no hole in it, held with eyelets in the same position as the eyelets for the FRTW window panel, and equipped with two handles to pull into position snugly). Pick up the chimney and guide it out of the window. With a heave ho, lift and hook the chimney into the roof ledge hook. If your steel strap is well-positioned, it will take most of the weight of the chimney, so you just need to grasp the stove end of the chimney and guide it into the elbow that is already fixed to the stove.
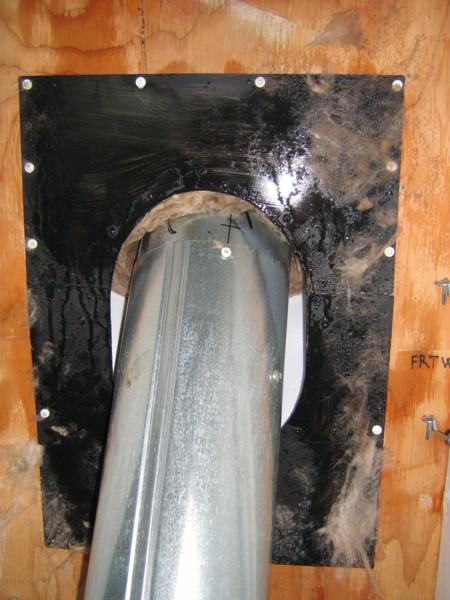
Telescoping outer chimney joint screwed to FRTW window panel, seen from inside.
Take the bottom half of the FRTW window panel and get ready to flip it up in place. Remove the little piece of tape preventing the telescoping outer chimney joint from sliding down, and let it slide down a bit, but not too much. Flip up the FRTW half window panel, and hook it to the window frame. Now push the telescoping outer chimney joint up against the FRTW half window panel, and either tape it temporarily in place, or use your third hand (I really need to get one of those) to go get a screw and a screwdriver to hold it there. Slide the top half of the FRTW half window panel into place and hook it up. Finish by adding more screws so the telescoping outer chimney joint is well attached to the FRTW window panel.
6.7) Finishing touches. Maybe spray some water on all FRTW panels (the damper they are, the better; it's cheap insurance). Stick the magnetic thermometer on the stovepipe (I mark the location so it's always in the same spot, so my temperature measurements are hopefully repeatable). Use leftover fiberglass batts to insulate the FRTW window panel and block all drafts (it's really worth the effort, even if the result is ugly). Make sure all heat shields are in place. (My current setup also requires a small FRTW panel on the window frame, where the stovepipe comes close to it). Clean up if you've had the misfortune of scattering a bit of fiberglass particles here and there. If the pizza dish on top of the chimney cap isn't quite horizontal, you can always bend the steel straps holding it; cheap, but it works.
Recently, 2021-Dec-10, because we were supposed to be hit with 100km/h winds and freezing rain, I decided to pre-assemble as much of the chimney as I could, and leave it like that in the basement, to make it less painful and long to set up. It's a tradeoff: the more it's ready to go into action, the harder it is to transport it elsewhere. In my case the tradeoff seemed worth it, since I'm not going anywhere and I've got plenty of room for storage.
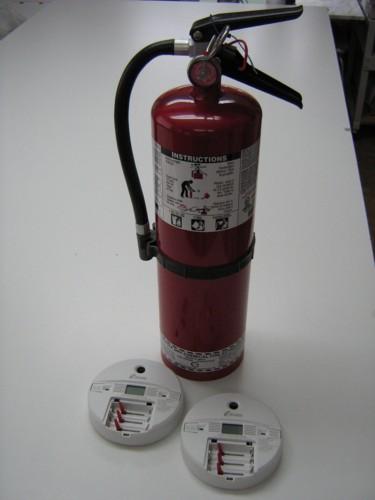
Large (17.5 lbs) fire extinguisher and two carbon monoxide detectors.
I repeat once again, this setup is not designed to be used like a normal woodstove. It's for emergencies. A normal woodstove can be filled to the brim with wood and then the whole household can go safely to sleep. This woodstove is not like that. It needs constant monitoring.
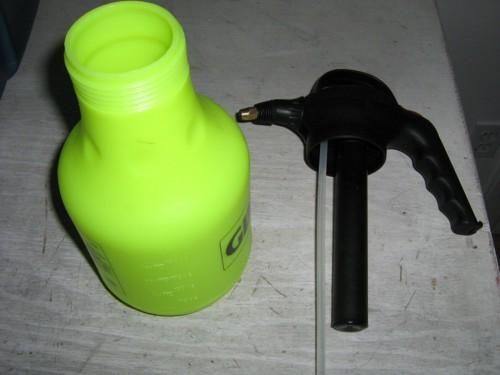
1.5 liter pressurized water sprayer.
It is assumed that at least one person will be actively watching this stove, checking the temperature of the surrounding FRTW panels and keeping them damp, checking outside to see if everything is OK close to the chimney exit, etc.
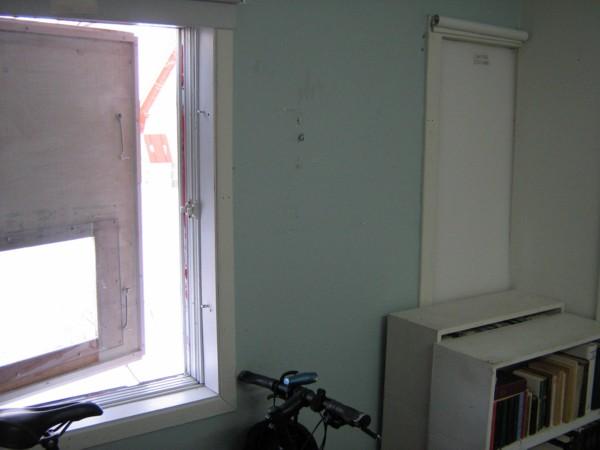
Easy to open side window to monitor exterior of the house close to chimney exit.
One of the most important safety measures is to never put in more fuel than your setup can safely consume at 100% air intake. In other words, it's like having a car with a very small motor, such than even if you floor the gas pedal, the car will never go over the speed limit.
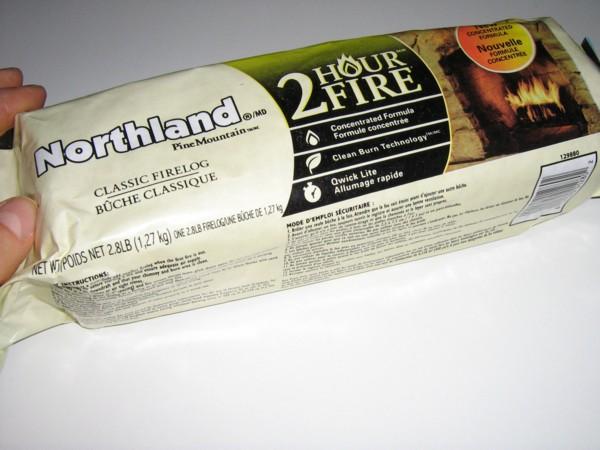
Artificial log.
The way I do this is to always use the same brand of artificial log, and only one half-log at a time. I've done several burn tests, and determined a safe operating envelope. Each log must be cut in half (easy, you can do it with a cheap knife). You only put in one half-log at a time. When the half-log is toward the end of its cycle, and the flue temperature goes down, then and only then can you add a new half-log. And don't poke those logs! If you respect those rules, you're pretty safe. Even with the air intake open at 100%, you will not be able to make the temperatures dangerously high.
I repeat: wood fires (especially young fires) can burn out of control if the user is negligent. When a big fire gets out of control, it can be difficult to reign it back in. The fire starts to generate such strong suction that it pulls air into itself from every crack and crevice, and turning down the vent almost doesn't work anymore. That is a scary experience when you know the stove is much hotter than it should be and you can't seem to control the fire inside of it.
A few more operating tips:
7.1) Don't forget to check outside. If you're using this stove, it's because you risk dying because of cold temperatures. So going outside regularly to check if everything is normal close to the chimney exit is no fun. But better that, than burning down your house. It's nice to have a second window close to the chimney, that lets you poke your head out to check things. (One of the reasons why I chose the current location for my setup is the availability of that second monitoring window.)
7.2) Keep the FRTW panels damp. The main danger with wood objects too close to a stove is that they gradually char and dry out over weeks/months and so their ignition temperature gets lower and lower. An inexpensive hand-pressurized water sprayer is nice for this. This water sprayer also gives you an intermediate step if somehow the fire gets too big inside the stove, before whipping out your big fire extinguisher (which is expensive, dangerous and messy to use), since dumping large amounts of water inside a wood stove is not very good.
7.3) Stove emits smoke during first hot minutes. To avoid having the stove rust in the basement during long years of storage, it's probably a good idea to spray it with a thin coat of WD-40 or some other lubricant. But this means the stove will smoke like a huge cigar when it reaches operating temperatures. It might be better to open doors and windows during those first smokey moments (even though it seems very counter-productive when you're freezing in the dark!). (Maybe wipe the stove with paper towels and paint thinner before lighting it for the first time? I've never tried.)
7.4) Don't let the house get cold. Every object in your house or appartment is a kind of "storage container" for heat or cold. If the power goes out, and you wait until your whole house, with everything it contains, is the same temperature as outside, you are going to have to fight an uphill battle to bring everything up to a confortable inside temperature again. It can be done, but try to avoid it.
7.5) Some usage numbers. My most recent burn test was 2014-Feb-26, starting at 23h17. I had left the whole appartment without heating for several hours, and finished preparation by opening the front door and two windows for ten minutes. It was about -12 celcius outside, with little wind, and inside temperature settled at about 7 celcius after I closed the door and windows (the sensor is high in my appartment, so average indoor temperature was probably colder). I kept the air intake at about 25% (three-quarters closed), and the flue temperature 18" above the stove between 100 and 110 degrees celcius. Over a period of four hours, with two half-logs, I gained a bit over 1 degree celcius per hour, heating the whole appartment (three rooms).
Extrapolating, I guess two boxes a day (24 half-logs) would pull me through the coldest temperatures we normally get (about minus twenty celcius). At about 18$ a box, this is phenomenally expensive! But we're talking about emergency heating, so compact and insect-free artificial logs I can stack in the basement and forget for decades seem like a good idea. Eventually, I'd like to have at least three weeks' worth of emergency heating. It would not take up too much space, and could still be carried out and moved into another location, should I need to vacate my appartment.
7.6) Don't let creosote accumulate inside the chimney. Since this stove is only used for emergencies, you normally shouldn't have to worry about chimney fires caused by accumulation of creosote, but at least keep it in the back of your mind. If the state of emergency lasted longer than a few weeks, I would dismantle the chimney, clean it, and then reinstall it.
7.7) About a half-teaspoon of Vaseline in a piece of paper towel is a nice firestarter. The paper wrapping of the artificial log doubles as its firestarter. A plain half-log without its wrapper is a bit hard to light. Vaseline and paper towels work fine.
Finally, you can of course use real wood, or other brands of artificial logs, etc. But then, make burn tests and very carefully expand the burn envelope, making a logbook of times, amounts and type of fuel added, flue temperatures, temperatures outside and inside the house, temperatures at the exit of the chimney outside, PPM readings on the carbon monoxide detectors (they should always be zero, but you still have to check), and regularly put your hand over all the FRTW surfaces to make sure they remain cool. These burn tests require time and effort, and are not the kind of thing you want to start doing during an emergency!
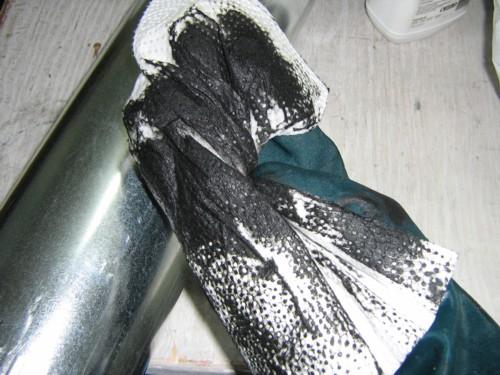
Sooty paper towel.
Disassembly is roughly doing in reverse the Setup, but with a few additional steps, mostly to clean up creosote and fiberglass.
8.1) Make bloody sure the fire is out. If you can't stick your hand inside the stove and play around with the ashes, wait some more. If you don't have any time, you can try the hand-pressurized water sprayer, although I don't recommend it.
8.2) Prepare adequate floor space and cleaning tools. You'll be placing the fully-assembled long chimney on the floor, so make some room. Also remember you might be dealing with stinking and sticky "chimney juice", little shards of fiberglass flying around, black soot that is very hard to clean out of cloths, and cold weather (there is a big hole in the house while you remove the chimney). Try to contain these bad things to a single room. Prepare for the worst (rubber gloves, raincoat or work cloths that can get dirty, vacuum cleaner, paint thinner, plenty of paper towels, etc.

Fiberglass residues on FRTW Window Panel.
8.3) Prepare to remove chimney. Remove the stovepipe thermometer, the heat shields for the walls (leave what is underneath the stove for now), the little FRTW window ledge panel if you have one, etc. Gently remove the fiberglass insulation from the FRTW window panel, and start stacking them out of the way (try to avoid kicking little fiberglass shards into the air). Vacuum the fiberglass that always sticks on the FRTW window panel (especially with the condensation in cold weather, which ices up and "glues" part of the fiberglass to the plywood). Remove all screws connecting FRTW window panel to Telescoping outer chimney joint (which might slide down at this point, but that's OK).
8.4) Remove chimney. This step is doable alone, but easier with two. Unhook and remove top and bottom halves of FRTW window panel. Slide chimney bottom out of stove. Chimney will now hang by the roof ledge hook. Catch the Telescoping outer chimney joint before it slides out and falls on the floor and set it aside. Move the whole stove a few feet away, to get in a better position. Lift whole chimney off the roof ledge hook, bring into the house, and set down on your floor space. Quickly plug window opening with whatever window is normally there. (I re-seat the ordinary plywood panel. I also temporarily seal the joint with cheap moving tape in the Winter, then semi-permanently weatherproof with "Seal 'N Strip" from the outside, when warmer Spring temperatures allow.)
8.5) Remove chimney insulation. Remove all tape holding steel strapping and aluminum tubes. Gently slide out aluminum tubes, trying to minimize airborne fiberglass particles, and continue to stack half-batts of fiberglass. Gently slide garbage bag over stack of fiberglass half-batts. Close bag (not hermetically, because you want frozen water to evaporate out). Vacuum fiberglass residues from floor, outside of steel chimney tubes, inside of aluminum chimney tubes, your knees, the inside of your wallet, etc. (I'm kidding a bit!).
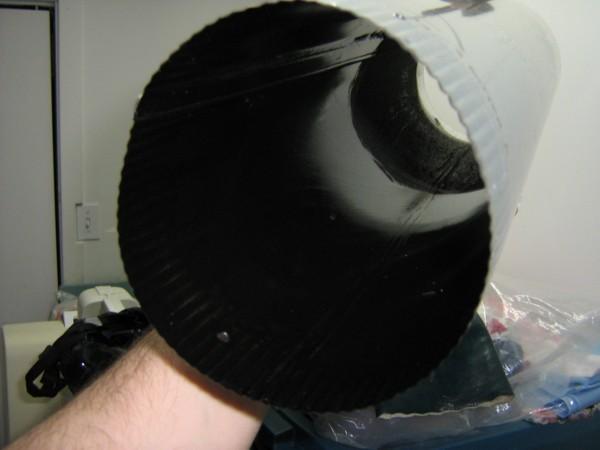
Partially-cleaned stovepipe section.
8.6) Disassemble and clean steel stovepipes. Remove all screws holding stovepipe sections (including chimney cap). Separate all tubes. (I find "bending" two tubes gently back and forth while they are flat on the floor, while pulling apart, works well.) Now the messy part: Using paper towels and paint thinner, clean the inside of all the steel stovepipes as best you can. Not surgically clean, just a rough attempt, to avoid putting creosote all over the place and also to avoid chimney fires the next time you use it. Stack the cleaned chimney tubes. Because creosote stinks almost forever (because it doesn't dry out), put all parts that have creosote into garbage bags (not the stove).
8.7) Clean stove. Unscrew four legs from stove. Take stove outside and empty ashes. I'm afraid of rust, so I don't store the stove in a plastic bag, but I do close the door and plug the 45 degree elbow on top of the stove with a plastic bag held with an elastic, to try to control foul smells.
8.8) Store everything away. Because of the smell, I keep everything in the basement. For insurance purposes, it's probably better to store the stove in a location and in a manner which makes it clear it was not being used. (Imagine your house having burnt down, and the insurance investigators rummaging through the debris: they should be able to take pictures proving the stove was not a factor.)
My ignorance is almost as vast as my pride, so I have much to learn about wood heating. Here are some questions:
9.1) Is my operating temperature too low? My burn tests so far have not tried normal wood, nor temperatures exceeding 150 celcius (as measured 18" from top of stove on flue). Should I be maintaining higher operating temperatures? Was the creosote accumulation I had normal, or excessive?
9.2) Operation during storms. How will the chimney react to very high winds? It seems solid enough, but I've never tried it during a fierce winter storm. Will gusts of wind blow down into the chimney? Some of the chimney caps I see on rooftops seem to have more wind shielding. Should I try to add a band of steel, underneath the pizza dish, with enough space to let smoke out, but that would block side winds? Also, if a direct wind back toward the roof persists, will that set fire to the roof? The roof was covered in thick snow when I tested it, but I can't depend on that extra protection.
9.3) Homemade flue damper? Maybe I should make a better-fitting flue damper, to see if it helps regulating the stove.
9.4) Do artificial logs have a life expectancy? Manufactured firelogs combine two industrial byproducts, sawdust and petroleum wax, which are mixed and extruded into familiar log-like shapes, the sawdust particles serving as the wick, and the wax as the fuel. But will the artificial logs dry out over time, i.e. will the petroleum fuel evaporate, maybe the lighter, more volatile fractions? Will a two-hour log turn into a one and a half hour log after a few years of storage? (Recently, 2021-Dec-10, I purchased more logs, and this time I took the time to put everything in sealed garbage bags, hoping to slow down the evaporation of volatiles. I don't know if this will have any effect.)
Here are some dumb mistakes that you'll want to avoid:
10.1) Misaligned steel stovepipe screw holes. I drilled the holes to connect sections of the steel stovepipe tubes carelessly, so they are "handed", i.e. the holes won't line up if you are trying to line up hole A of top tube with hole B of bottom tube... If the holes had been drilled exactly opposed to each other, this additional complexity would have been avoided. Just take the time to measure and mark the location of the holes before drilling...
10.2) Cheap moving tape to hold the aluminum tubes. The bloody stuff disintegrates when you try to remove it, even if it's only been there a few days!
10.3) Playing with the half-consumed artificial log. It was late at night during one of the first burn tests, and I wanted to hit the sack, and the stupid three-quarters of a log (I had already used up a quarter of the same log for the previous burn test) was still burning after over 2 hours. So Uncle Bob in his infinite wisdom figured: "If I poke it around and chop it into smaller pieces, it will burn out faster". Yeah, and also start heating like the engine of an F-15. Boy, did things ever start getting hot fast! When the FRTW plywood panels on both walls got very hot to the touch, I figured I needed to abort mission. Closing all air intakes didn't work fast enough, so in went several cups of water. I scared myself a bit!
To make things worse, the package on the artificial log explicitely warns about exactly that phenomenon! After this I added the "Heat Shield" and a 1.5 liter pressurized water sprayer (which gives me an intermediate step before going to the real fire extinguisher, and lets me spray water on hot FRTW panels, or inside the stove, etc.).
10.4) Dismantling chimney with inadequate floor space. Remember that you might have "chimney juice" spill out of the chimney as you bring it in to the house! That stuff stinks, sticks and stains! If you move the chimney around trying to find room for it, you'll spill it all over the place. (Yes dear, if somebody had videotaped me doing that, the video would have gone viral on YouTube...) Normally things shouldn't be that bad (this happened to me after one of my first burn tests, when the chimney was not insulated, so it was awfully wet inside).
10.5) Contaminating FRTW panels with flammable liquids. There was a bit of rust under the stove, and I wanted to put some WD-40 before putting it into storage (especially since "storage" is in a rather humid basement). So I sprayed some WD-40, but the stove was resting on some FRTW panels. Not brilliant to treat with a petroleum distillate (flammable) a piece of wood that I paid a lot of money to have treated with a fire retardant...
10.6) Mismatch between the angle of the telescoping outer chimney joint, and the FRTW window panel. In my current setup, the chimney is a bit too steep, so the steel plate of the telescoping outer chimney joint doesn't rest nicely against the FRTW window panel. So I push and screw and quickly look elsewhere... I would need to re-build a new FRTW window panel, this time cutting the central hole after having installed the chimney and actually measured exactly where it went.
10.7) Insufficiently thick FRTW plywood. A half-inch is a bit thin, at least for the window panel. Unfortunately, that is the only thickness I could buy around here. If I did it over again, I'd just screw two layers together.
10.8) Ineffective flue damper. Maybe I just don't know how to use it correctly, but I eventually removed the flue damper. I had installed it as close as possible to the FRTW window panel, but still inside, to encourage heat to be emitted inside the house. But the damper supplied by Cylinder Stoves is so small that even fully closed it doesn't dampen the flow. Anyway, it didn't seem to hurt if I removed it. I currently plug the holes with two bolts. I can't leave those bolts in place because I couldn't then store the stovepipes nested.
A buddy knowledgeable about these things claims that: "A damper is not generally used to control the fire when the stove is in operation [...] because under normal conditions it would merely cause smoke (and possibly CO) to back up into the dwelling. The damper is mostly used to close up the flue when a stove is not in use, which keeps the cold air out, and warm air in. Otherwise cold air will rush down the chimney turn the stove into a very effective air conditioning unit. A (well-fitting) damper stops this from happening. Once you've felt ice-cold air pouring down a chimney in the winter, you will immediately become pro-damper!"
I suspect he's right, so if I did it again, I would not bother with the flue damper (I remove the chimney from the window when not in use).
10.9) Vacuuming inside of stove. Last time I took down the setup, I vacuumed the inside of the stove, and then I threw away the vacuum cleaner bag because I was afraid the fine soot would go through the filter and contaminate everything, on top of stinking up my appartment. So that might not be a brilliant idea.
My current homemade chimney sucks deeply. If I had more money and equipment, I would do things very differently.
11.1) Bayonet lock for steel stovepipe sections. The nesting steel stovepipe sold by Cylinder Stoves is wonderful. As light as can be (we can't use aluminum because of the heat), compact when stored, inexpensive (we don't need stainless steel for an emergency chimney). But it's a hassle to screw the sections together, and an annoyance to pull and tug to try to separate the sections after use. There already are some "twist-lock" chimney sections advertised, but I haven't seen them for nesting stovepipes of small inner diameter (5"). It would be very pleasant to easily insert one section into the other, turn and hear "click" as it locks into place. Also, it might be nice if the locking mechanism, when in "open" position, could somehow prevent the chimney from slipping through the Spherical chimney-to-wall joint described below (so the chimney, as it is being assembled, could not fall out of the house!). Less importantly, it would be nice if this lock mechanism had a very low profile to allow nesting of the stovepipes inside the house. Such a locking mechanism would seem to require some serious hydraulic presses with expensive dies (such as those used to make steel car panels) to manufacture inexpensively.
11.2) No handling of fiberglass insulation. Insulation is necessary to prevent excessive water condensation in very cold weather, and fiberglass insulation works very well, but it should be installed once and then sealed in for life, like professionally-made chimneys. Here again, I've never seen small inner diameter (5") bayonet-locked insulated chimney sections, especially with inner steel (non stainless, to be less expensive) and outer aluminum (to save weight). Since the insulation would be sealed, those sections of the chimney could not be nested, so they would be bulky when stored. But the gains in installation speed and simplicity would make up for it.
11.3) Constant-diameter chimney cap. Chimney caps have several functions: they must keep in the sparks, keep out the wind and snow and rain, let the smoke out freely, and be easy to clean. To these requirements we must add two more for my dream setup: it must perform all these functions equally well despite being at varying angles, and it must not have a bigger diameter than the insulated chimney (so the chimney can be pushed out of the smallest hole possible in the window panel).
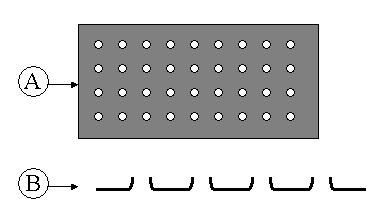
A) Perforated steel sheet.
B) Side view of perforations (NOT to scale! The holes are actually very small!)
The basic material is steel sheet (same thickness as for plain stovepipe), but with small holes. The holes are small enough to block sparks. Moreover, the perforations are "pushed out", so each hole looks like a very short inverted funnel.
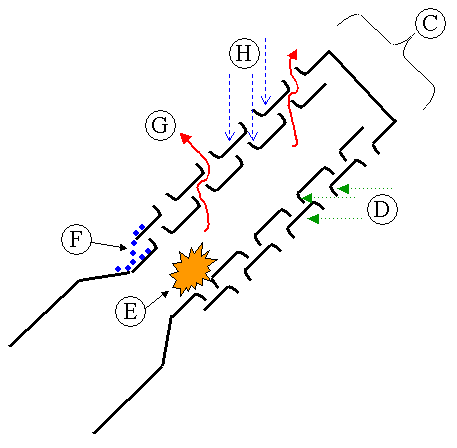
C) All parts of the chimney cap are within the outside diameter of
the rest of the insulated chimney.
D) Wind gusts can hardly get in.
E) Nasty burning sparks cannot get out.
F) Drops of rain and molten snow travel down, around each perforation,
without falling in.
G) Smoke can get out.
H) Rain cannot get in.
The chimney cap is just two concentric cylinders of this perforated sheet, with holes carefully NOT aligned, capped off at the end. The outer perforated cylinder can be screwed off, so both perforated cylinders can be easily cleaned. The actual length of the chimney cap is however long is necessary to get the same gas flow as what comes out of the insulated chimney (probably easy to determine with trial and error). The chimney is normally at a 45 degree angle, but this design could probably be made to work from 30-ish degrees to 60-ish degrees, just by making the perforations spaced farther apart and the "inverted funnels" of those perforations go up higher.
With such a chimney cap, you just need a small hole through which you push the whole chimney, so installation is much easier. Also, the precise "up-down" angle of the chimney becomes irrelevant, as long as it's roughly pointing up. Finally, if you rotate the chimney as you are installing it, that doesn't matter either (as opposed to my current setup, where the opening of the chimney cap has to point directly skyward).
11.4) Spherical chimney-to-wall joint. I often struggle to draw pictures or give complex explanations to my readers, but this time all I had to do was grab some pliers and go to the bathroom. Yes, a perfect mockup of what I need is underneath my bathroom sink!
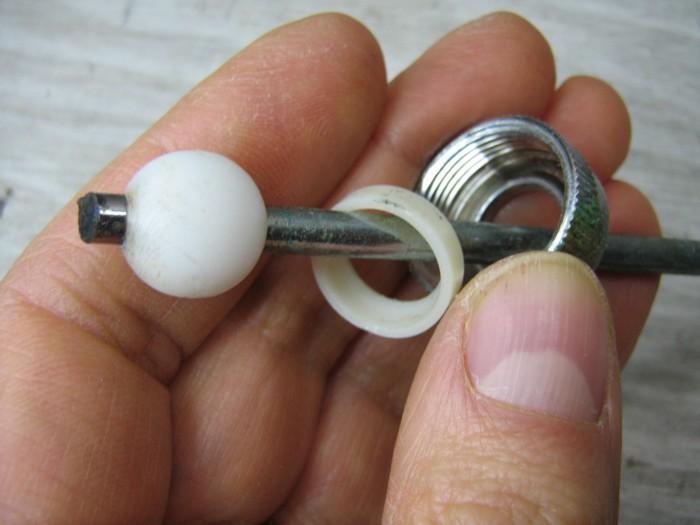
Cylinder through sphere and waterproof ring that rubs against sphere.
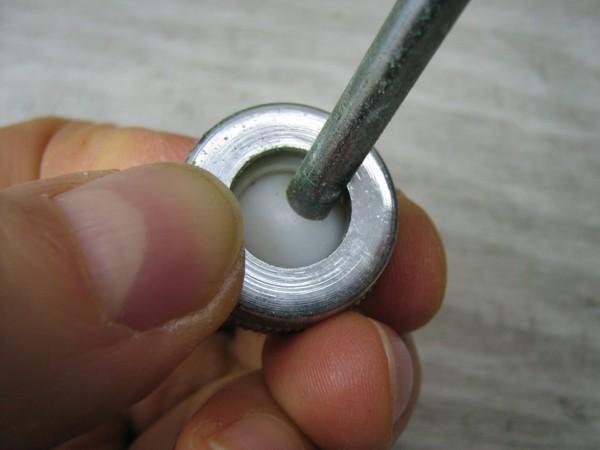
Imagine a chimney coming out of a house at several possible angles, with no drafts or water coming in.
With some cleverly-shaped sheet metal, a nice spherical chimney-to-wall joint could be designed. The FRTW window panel would still be necessary (and different for each window), but the hole in that FRTW panel would always be circular and the same size. For a normal installation, the spherical joint would remain screwed to the FRTW window panel. This in itself means you could easily insulate that FRTW panel (basically sandwich the fiberglass between two layers of plywood), so you would never need to touch fiberglass again. It would also be a lot easier to change locations for the stove, since the chimney angle could be varied without compromising solidity and without letting in drafts or water.
Installation would be a snap: just pop the FRTW panel in place, start assembling sections of chimney, starting with the chimney cap (since they now have nice bayonet locks, it's easy), and push the chimney out progressively as it's being assembled. You're a bit too close to the roof or a tree branch? Add another insulated section and push out some more. Or you can angle the chimney more toward the left or the right, or more up or down. Easy! Another advantage is that in very high winds, you could just kill the fire and remove the chimney temporarily (when you need an emergency stove, it's often during extreme weather events; 120 km/h winds are not unheard of around here).
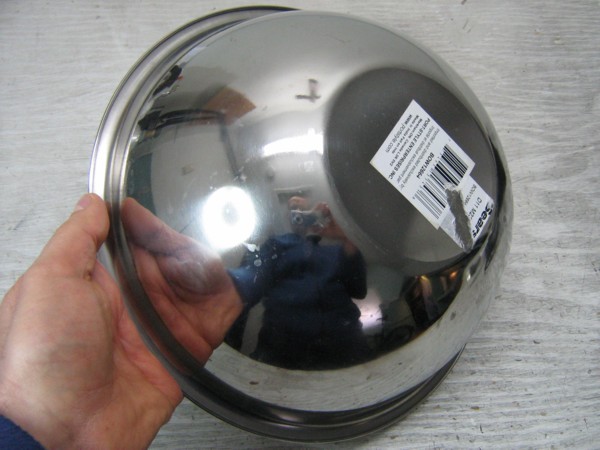
This salad bowl piece of sheet metal has a promising shape!
Since this would all be made of sheet metal, there would be no risk of fire. With a bit of cleverness, the hole in the sphere where the chimney goes through could have little wheels, or at least a surface with reduced friction, so the chimney could "ride" out and in easily. With a bit more cleverness, the whole spherical joint could be disassembled and take much less space (a bit like nesting salad bowls one into the other). I don't know exactly how it would be done, but it would be nice to have two levers that controlled some kind of "threaded lock ring", one to lock the spherical joint in a given angle, and another to lock the chimney inside the spherical joint. Both such locks would also serve to make a waterproof and windproof joint.
11.5) Twin pivoting 90 degree elbows at stove? Not sure about this one, because two 90 degree elbows reduce flow inside chimney more than one 45 degree elbow, and that might be just enough to cause CO poisoning... But I'd like to test it! With twin pivoting 90 degree elbows (like the exhaust nozzles of the Harrier jump-jet), the versatility of the "Spherical chimney-to-wall joint" can be fully used. The stove can pretty well be oriented in any direction, and place as close or as far to the window as clearance to the wall and window frame will allow. But they need to be able to pivot, and also lock securely in place.
The current ready-made wood stove is OK, but it could be improved:
12.1) Bayonet lock for connection to chimney. Just the same connection mechanism as for the chimney bayonet locks. That would make the whole setup much safer (no risk of the chimney popping out of the stove), and easier (no need to design a contorted connection mechanism). I'm guessing the only modification would be to allow the closing and opening mechanism to be operated without having to pick up the stove and "twist-lock" it! (Some kind of slip ring?)
12.2) Path for secondary combustion air. There is no path for secondary combustion air, and no baffle before the hot gases exhaust the stove, so I assume combustion is very inefficient. I'm pretty sure some thin steel replaceable liner could be designed which would:
(i) be a kind of consumable that would protect the inside of the stove, so
the stove itself could last very long (even though it would now be made of
thinner steel, which would make it lighter!);
(ii) provide a baffle before the exit hole to slow down the combusting gases
and give them time to finish burning;
(iii) channel some secondary combustion air (between the liner and the stove
walls) from the air intake to the internal baffle.
Eventually it would be nice if there was a version of this stove that was "EPA-rated", i.e. approved by some government agency as not polluting too much. It can be done in a portable stove, even though the market would be minuscule.
12.3) Pet peeve: cleaning out the ashes. By modifying the door hinge just a bit, the stove door could be made to open way out and rest flat against the side of the stove. Then, with a little hook or something to hold the door flat, and a handle at the back of the stove, you could slip a garbage bag over the front opening of the stove, lift it up by the back handle, and shake out all the ashes into the garbage bag. Yes, that's overkill for a camping stove (who cares if there are a bit of ashes in the middle of the woods?), but for use inside an appartment, it's a nice touch.
Let's Adore Jesus-Eucharist! | Home >> Varia >> Bachelor's Kit