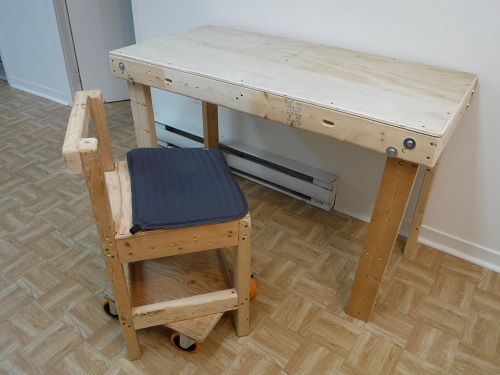
Table Mode.
Let's Adore Jesus-Eucharist! | Home >> Varia >> Bachelor's Kit

Table Mode.
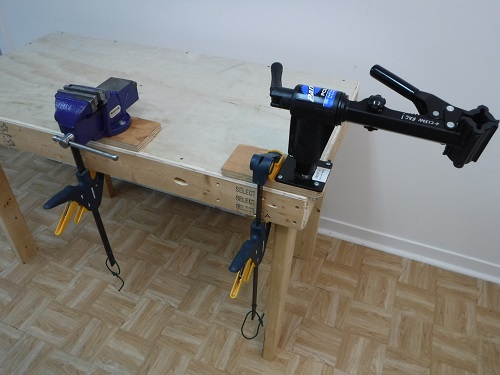
Workbench Mode.
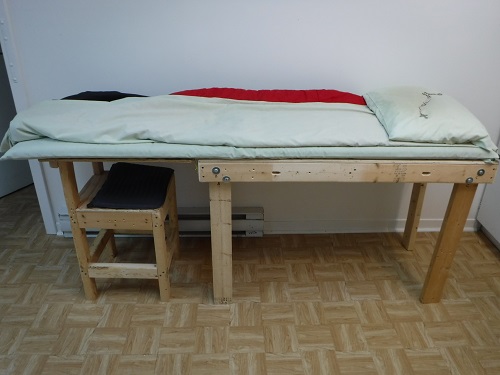
Bed Mode.
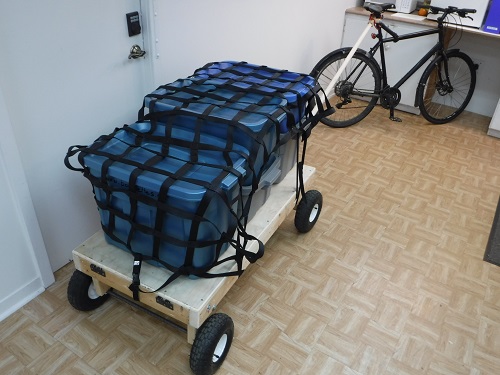
Bicycle Trailer Mode.
Yes, the name "Survival Table" is a bit of a joke! No, you are not supposed to carry this table on your back, along with your gas mask and your machine gun, in order to survive like Rambo.
It's just a small inexpensive table that you can make yourself with just about only a handsaw and a cordless drill, and that can also be used as a workbench, a bed, a bicycle cart, and hopefully (I have not implemented those features yet) a raft and a pulk (a kind of toboggan to pull cargo over snow). Actually, I'm rushing this article out not because it's ready for publication, but because I want to be able to rebuild this table if something bad happens (like my appartment burns down, etc.).
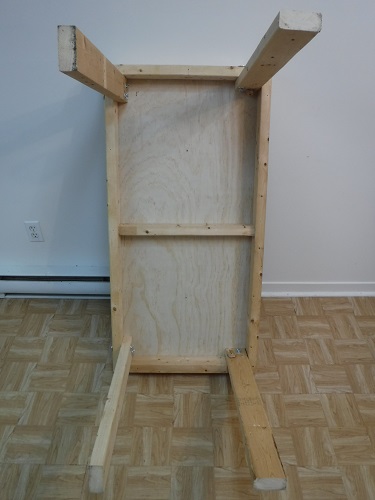
Underneath view.
The table top is simple. Just a 2 by 4 foot panel made of 0.5" plywood, glued to a frame of 2x4s, themselves held together at the corners with 4" decking screws (2 each corner). I started by using 3" screws, and I wanted to add a small plywood "L"-shaped piece at each corner, so there would be plywood on top and on the bottom of each corner. Corners just seem a weak point of this design. Eventually I cheaped out and just put 4" screws, which are not only longer but a bigger diameter. Would gluing plywood reinforcements be worth the trouble? I don't know. Also, you have to locate those long screws carefully, to avoid conflicting with the carriage bolts used to hold the legs.
I added an extra 2x3 crossmember to support the panel in the middle. The top plywood panel just seemed a little bit weak without it (remember I have to be able to jump up and down on this table).
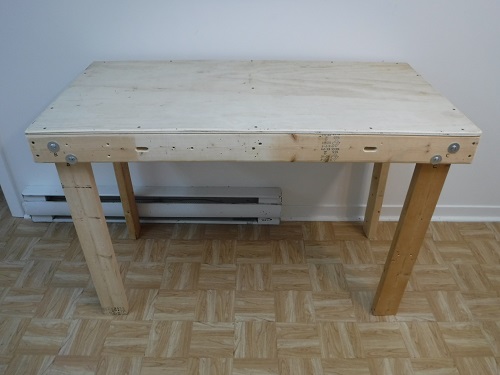
Frontal view.
The legs are plain 2x4, long enough for you to be comfortable working with your laptop on the table. (For me it's about 30.5"; maybe next time I'll try 31.5", and cut the legs if it turns out to be too high for typing comfortably for hours at a time.)
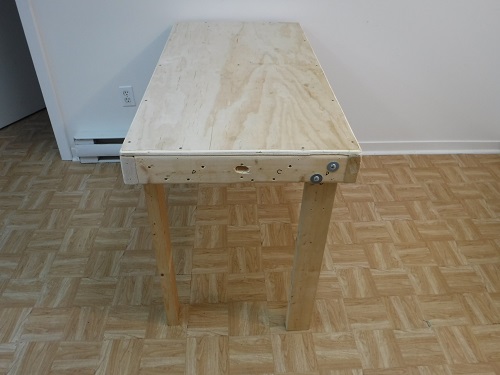
Side view.
I don't know if it helps much, but I normally install two legs in one direction, and the other two in the other direction, since 2x4s are more wobbly along their thin side. This seems to make the whole table less wobbly.
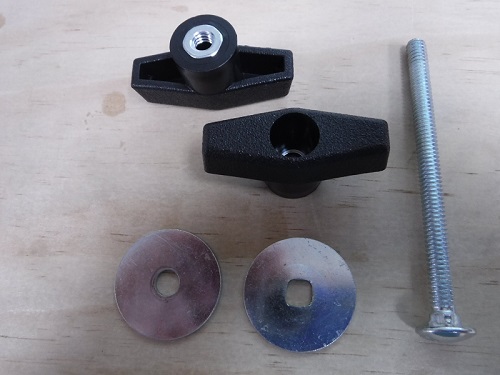
Carriage bolt,
large washer with bolt-locking squared-out hole,
normal large washer,
and comfortable plastic knobnut with through-hole.
A few details about hardware. Carriage bolts are 0.25" diameter, 3.5" long. I used extra-large washers to spread the load over more wood. The washers that are at the head end of the carriage bolts have been filed with a chainsaw file inside the hole, about 3 passes with the file at each corner, so their holes are square(-ish), so the head of the carriage bolt will slip in and not turn. (This is quite easy to do; they should sell washers with square inside holes just for using with carriage bolts, since it's so practical!) Because the large washer makes a lot of friction, you don't need two tools to tighten a bolt. The head end will normally stay still and not turn when you tighten the nut at the other end.
Metal wingnuts are inexpensive, easy to find, and despicable. They are made of very cheap metal, their threads strip easily, and to add insult to injury, the "wings" are so small they painfully bite into your fingers when you try to tighten or loosen them. I did find nuts with nice big comfortable knobs ("knobnuts"?): "Paulin 1/4 Wing 'T' Knob; Home Depot part# 222-831; $5.29". It was surprizingly difficult to find them, especially for such a simple and useful piece of hardware. McMaster-Carr (usually the ultimate source for such things) didn't have any like this, same with eBay. Notice the knob has a through-hole (i.e. if your bolt is too long, the knob will still work). Also, I have no idea if they will last long (plastic becomes brittle with age), and I don't know if they will just break in your hands when you try to use them outside in the cold Winter. Add a drop of transmission oil before use, and keep them lubricated, it will probably extend their lifetime. Another note about Home Depot and those "T-knobs": last time I purchased 6, and 2 were out-of-the-box failures (bad threads on nuts). Quality control sucks, so check each one individually before buying...
This combination of "non-turn" carriage bolt, extra-large washers, and comfortable knobnut provides a strong, wobble-free, tool-less, and relatively cheap way of connecting pieces of wood. I must be stupid, because it took me a lot of time and money and effort and failed attempts to arrive at such an obvious way of connecting the legs to the table...
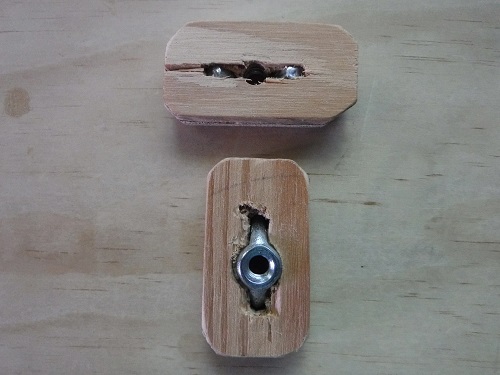
DIY Plywood knobnuts.
The pastic "knobnuts" are so expensive they make my eyes water (about 50$ just for nuts? It's more than the whole table!), so I tried making kludgy knobs out of scraps of 0.5" plywood. They work quite well! (but not as well as the real plastic knobnuts, sadly). I draw out a 1x2" rectangle on the scrap of plywood (but don't cut it out yet, since it's easier to clamp when it's big). Drill the through hole for the carriage bolt with a 0.25" drill bit. Drill at the two extremities where the wings of the nut will go with a 0.125" drill bit. Then again in the center hole and using a large 0.5" drill bit, just drill a little bit to make space for the wingnut's body. Then clamp a jigsaw blade in your visegrips and saw out the space for the wings of the nut, from the 0.25" hole to the 0.125" holes. (I find using an actual jigsaw for this to be almost overkill. A few pulls on the visegrip is usually enough.) Then, cut out the knob, sand the edges a bit and you're done. I haven't tried it yet, but I think scratching the surface of the wingnut with emery cloth, then de-greasing it, then gluing the wingnut into the hole in the plywood with epoxy glue might be good.
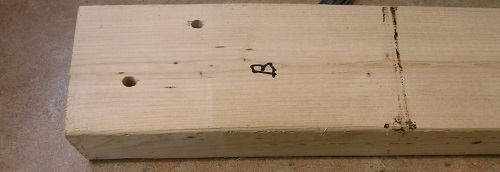
Unequally-spaced holes for table leg.
If you look carefully at the bolt holes in the table leg, you'll notice they are not equally distant from the edge of the table leg. It's because when you're bolting a leg to the table, you'll be drilling holes in the table frame that will be close to the end of a 2x4 (which is weaker). So I put the holes such that they are as far as can be from the edge of the other 2x4 they are connected to, while also spreading the load on the table leg.
Another detail which is a result of my under-equipped shop, is the identification of the table leg. Because I don't have a drill press, my holes tend to be not straight enough and precisely located enough for each leg to be interchangeable with the other legs. I drill holes through a leg as straight as I can, then clamp that leg on the corner of the table frame, and use the leg as a jig to drill matching holes through the 2x4 of the tabletop. So all those holes line up nicely and the bolts slide in easily, but don't mix up the legs! Yes, if I live long enough, I'll get a drill press! I would prefer if those morons at Makita made a slab-sided drill body that could be easily adapted to collaborate with a combination square, for a poor-man's drill press. (My current cordless drill has a body that doesn't have a single straight line in it anywhere. It's as if their plastic molds all have pustular dermatosis or something.)

Workbench Mode.
Not much to say here, except to warn the reader about dismissing this silly little workbench. I have purchased and built many workbenches in my life. I've used "Workmates", large expensive traditional workbenches (with tail vise, clutch-released Record metal front vise, a top made of a huge slab of maple, etc.), portable worktables made with cheap folding "banquet table legs" screwed on a 4x2' scrap of 0.75" plywood, etc.
This "survival table" is the result of many painful and expensive errors. It is quite solid (I can jump up and down on it), light and small enough so I can easily carry it around (and my workshop's advanced "dust collection system" is composed of me carrying my table outside on my porch and doing noisy and dirty things there, then bringing everything back inside to continue), large enough to support most operations (fixing lawnmowers or bicycles, cutting wood, building furniture), etc.
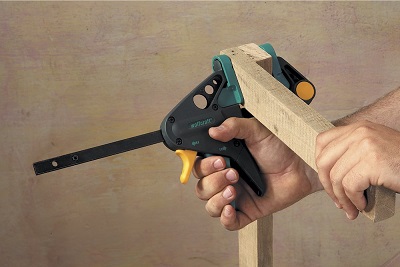
EHZ PRO One-hand clamps.
[Source]
I gave away all my woodworking vises (I had three beautiful ones). For the type of handyman work I do, good quality bar clamps are plenty sufficient to hold pieces of wood to my workbench. I also use them to hold my metal vise, my bicycle vise, my magnifying lamp, etc. I just permanently screw those objects to a scrap piece of 0.75" plywood, which I then secure to the table using the bar clamps. I find it a vast improvement over all the holes I had in the top of my previous workbench, and the fiddling around with bolts and wingnuts, etc. Remember, my type of work requires a lot of "tooling changes"; it's the contrary of a production facility, every job is different, and on top you need to "tear down" the workshop every night before going to bed.
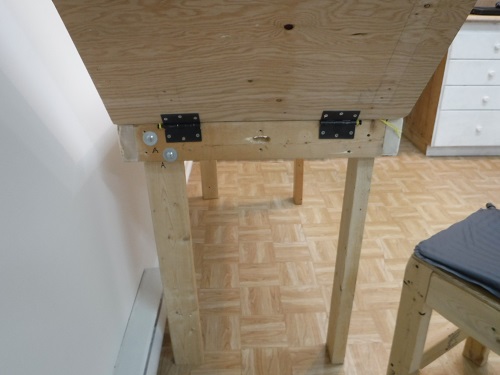
Bed extension panel.
With a couple of door hinges and an extra 2x2 foot panel of 0.5" plywood, you have a table extension with makes it just long enough to be used as a bed. When not used for the Bed Mode, this panel is nice as a sacrificial surface for the table when used as a workbench, and you're cutting material or painting or doing something else that could damage the tabletop. Replacing the extension panel is cheap (it's just a piece of plywood), whereas the tabletop is more complicated.

By the way, I know, that chair does look silly! But I made it with scraps of wood that were lying around, it has just the right height to support the bed extension (or an oversize piece of wood that is on the tabletop and that wants to fall off, like a 4x8' sheet of plywood you're trying to cut), you can remove the dolly by just lifting off the chair, so you can use the chair as a stable step to reach high places (like the top of my current bed), it's very "squarish" so you can lay it on its side and use it to support a large object you are working on (like the tabletop as I was figuring out how to attach the wheels to it!), etc. I never set out to build myself a chair, but now that I have it, I kind of like it! I could use real lumber to make it look nicer...
Another note about the chair: chair cushions! I tried various (and increasingly expensive) closed-cell foams, cut out from high-quality camping mattresses, and they all quickly began to "tamp down", to lose their cushioning effect. Then I got a nice little inflatable cushion from the same camping store, and it hasn't lost any cushioning... so air seems the most durable solution. It's also easy to remove when you want to use the chair as a stepladder.
An unplanned use for the chair-table combo is weak-man's chinups: since the top of the chair is at the same height as the tabletop, I can put a solid bar in between both, put two bar clamps on the chair top to prevent the bar from rolling off, then use the bar for easier chinups (i.e. not picking myself off the ground, because part of my body weight is still on my legs resting on the ground). It's easy to find a place to do situps and pushups, but chinups are usually much harder to do in the average appartment.
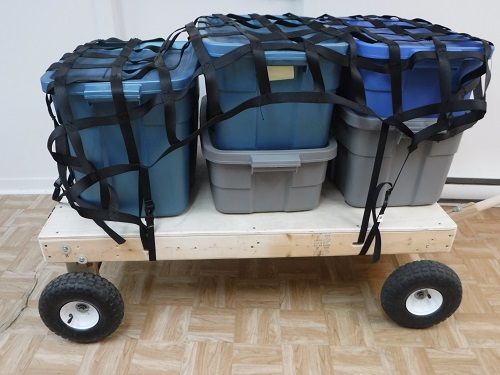
Side view of loaded trailer.
I've been battling for years, trying to buy or build a good bicycle trailer. My previous attempts are a partial failure and a partial success. This version has a few advantages. First, no need to buy fancy trailer hardware, apart from the wheels (standard pneumatic 10" wheels with integrated ball-bearings and a 5/8" hole for the axle). With some 5/8" rod, washers, cotter pins, etc., you can hack together a trailer that works reasonably well.
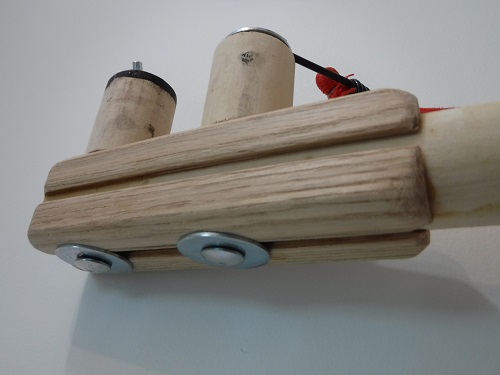
Towbar, bicycle end.
The towbar is very simple. Just a long (about 6 feet) wooden pole, ideally about 1.25" diameter. On a previous attempt I gouged out the end of such a pole to make it square, so connections to the trailer and bicycle would be easier, but that weakens the pole. Then I tried the other extreme: a big square piece of material (two lengths of 1x2 hardwood glued up), which I whittled down to a pole, everywhere except the two ends, using a router. That also works, but is quite expensive. The final solution is to buy cheap little wood trim that, when glued to a cylindrical pole, makes it roughly square. I did have to plane and sand a bit to make it fit, but the result is a pole with two square ends that make connections very easy.
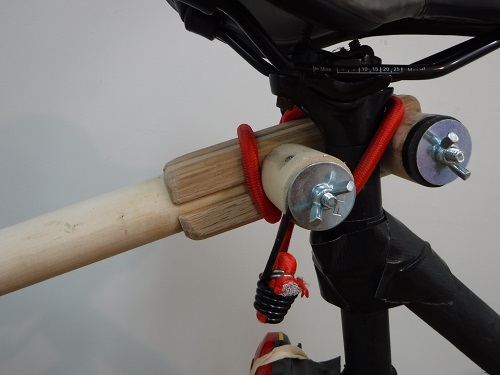
Towbar, connected to the bicycle seat tube.
The connection to the bicycle can be described as a "two-bristle toothbrush". It's not too noisy because the wood absorbs some of the shocks of being in contact with the metal seat tube. Also, the bungee elastic doesn't actually do much except keep the "two-bristle toothbrush" against the seat tube. I've pulled heavy loads this way, and it seems to work nicely so far, although I'm afraid of the seat tube snapping off, or even worse, the frame of the bicycle breaking at that point. You can barely see it on that picture, but I've jimmy-rigged a strut on my bicycle, a diagonal brace between the top horizontal tube of the frame, and the top of the seat tube, hoping this would reduce stresses when towing. (Just another piece of wooden pole, with both ends cut at 45 degrees, and carved out to fit with the bicycle tubes, then a steel screw-collar bolted to both ends at attached to the bicycle tubes. I'd prefer something in aluminum, but no money for now.).
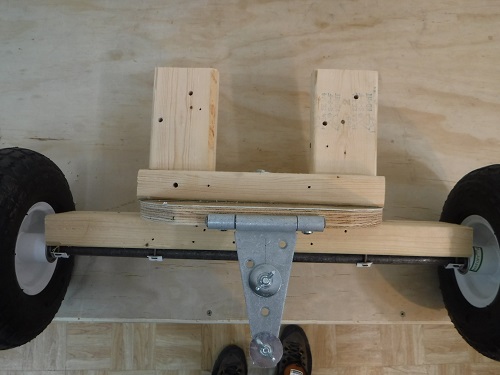
Front axle and steering pivot assembly, frontal view.
My previous attempt used fancy store-bought wheels that had gorgeous Ackerman steering. Nice, but apparently overkill for a silly bicycle trailer. This version just pivots in the center, with a long bolt. The axle side pivots on a circular piece of 0.75" plywood, with a one-foot diameter (well, my scrap of plywood was 12" in one dimension, but only about 9" in the other, but I figured that was OK, since the wheels don't normally spin 360 degrees, but only a bit to turn left or right). The table side pivots on a 2x4 layed on its side, 12" long (to match with the size of the plywood circle under it). Each wooden surface, top and bottom, has a peel-back floor tile on it, to reduce friction (the smooth and hard faces of the tiles rub against each other). You can see this better in the following picture, where the actual floor tiles match with the steering mechanism! (The floor tiles I had on hand were spares for when I damage my floor! And yes, I only noticed this silly detail after the pictures were taken...)
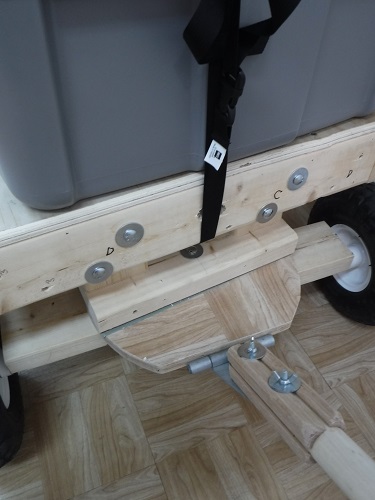
Steering pivot assembly, attached to towbar and seen from above.
The hinge to allow up-and-down movement of the towbar started out as a much thinner and lighter version, but it bent almost immediately, so this one is much stronger (but heavier, yuck). It's a "barn door hinge", i.e. with the pivot that cannot be pulled out.
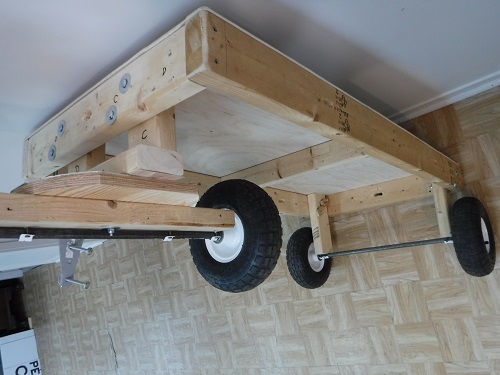
Another view of the wheels.
A few measurments: length of the rear-wheel struts: 9.75" (the axles are just attached to the bottom of those 2x4s with whatever hardware is handy). Length of front struts: 5 5/8". Axle lengths depend on the wheels you use.
I also gouged out slots for passing the straps used to tie down the cargo load. Just the 0.5" drill bit, two holes lengthwise on the 2x4 (to avoid weakening too much), and a bit of fussing around to join those holes. There are two such slots on each side, and one each in the front and back.
This is still Work-In-Progress. I would like to add the "raft" and "pulk" modes, and I wish I could make the whole thing lighter. (Higher-quality wood and T6065 aluminum axles would probably help for this.) But I also want to keep it simple, since I like the idea of walking into a typical North-American home-renovation store, buying everything you need for a reasonable amount of money, then building yourself a "Survival Table" in a day or two in your one-room appartment.
Let's Adore Jesus-Eucharist! | Home >> Varia >> Bachelor's Kit