Let's Adore Jesus-Eucharist! | Home >> Varia >> Bachelor's Kit

1) Introduction
2) A few principles of toolbox organization
3) Stacked Roughnecks on ball-bearings, containing heaps of tools and Ziplocs
4) Building the tower
5) Errors, Questions, etc.
This article describes how I currently organize my tools and my toolboxes, among others with a stack of toolboxes I pompously call a "Therblig Tool Tower" ("Therbligs comprise a system for analyzing the motions involved in performing a task", so as to optimize its execution. Source)

The standard symbols used in representing the 18 therbligs.
[Source]
A Frenchman from France tells me they (far-less pompously) call these things "workshop maidservants" ("servantes d'atelier").
Warning: I'm not a tradesman (plumber, electrician, machinist, carpenter, etc.), and many would be willing to testify that my skills as a handyman are, well, incipient. Moreover, there are people with Ph.D.'s who spend their entire professional careers organizing tools and workstations so they are efficient. Finally, I'm just trying a new way to organize my handyman's stuff, and maybe next week I'll change my mind. So do not expect much from this article, apart from food for thought on your own toolbox setup.
How can a worker have access to his tools, efficiently? Any toolbox organization provides access to tools. For some handy-squirrels, getting a tool might mean packing a knapsack with food, extra clothing and a sleeping bag, and going on an expedition into the shed, where mountains of accumulated layers will need to be moved, boxfuls of alluvial deposits will have to be filtered, like golddiggers panning for gold in a stream, and hopefully nobody will be buried by an avalanche of "family treasures" before the tool is found and brought back victoriously.
I'm aiming for something a bit faster!
Let's examine previous solutions to this problem, i.e. "prior art", that we can use as inspiration.

2.1) Cereal boxes (all parts just thrown in a box, as a heap). These days, breakfast cereals have all kinds of weird shapes: little toruses ("Cheerios"), pillows ("Shredded Wheats"), crooked and irregular shapes I have no idea how to describe scientifically ("Corn Flakes"), etc. They are packed as tighly as can be, using the method of organization called a "heap". Just pile up those objects in a heap and shake the box until all empty spaces are filled!
Such heaps are some of the most space-efficient solutions. If you put all your tools into a big box (including all your nuts and bolts and screws and washers and nails, etc.), and shake the box to remove as much empty space as possible, your tools will probably be as compactly stored as physically possible. Needless to say, that method also has a drawback: accessibility! If you want one specific flake in the box of Corn Flakes, you'll probably have to spill the whole box of cereals on the kitchen table and rummage around with your fingers until you find The Flake you wanted.
Advantages. Maximum compaction during storage, minimum cost and weight of organizing medium (there isn't any!). Easy to scale; if you buy more tools, just throw them in the heap. If you run out of space in a heap (i.e. a toolbox), just buy another toolbox and start filling it.
Disadvantages. Horrible access times. Also, fragile tools get damaged (unless they're in a protective container).
[Source]
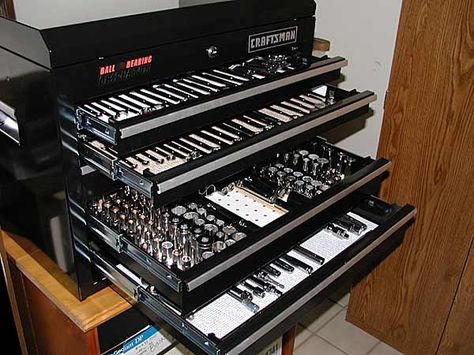
2.2) Car Mechanic's tool chests. Very appetizing (for a heman!): many shallow drawers, mounted on silky-smooth ball-bearing sliders, and when well-organized, all the tools are carefully layed out on the drawer bottoms so you can see all the tools, and easily grab any one of them; no need to rummage around or move something to be able to access something else.
Advantages. Compact storage of tools, yet rapid access.
Disadvantages. Such tool chests are very heavy and expensive. Also, they aren't very mobile: normally, you don't grab such a toolchest and move all your tools offsite. (Actually, I don't recall ever being able to even lift any such toolchest. Once filled with tools, they are normally hard to pick up.) You might roll it around on the concrete floor of the garage, but that's it.
[Source]
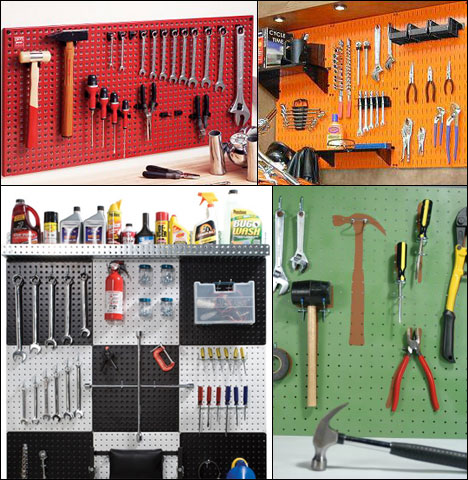
2.3) Pegboards. In a way, a pegboard is like one big drawer in a mechanic's tool chest, but with that drawer glued to a wall, and all the tools held in place by pegs. The sexiest pegboards have, behind each pegged tool, a little drawing of that tool.
Advantages. Fabulously easy to search for the tool you want: they are all there, in front of you, at eye level! Also, with well-designed pegs, very easy to grab the tool once you've found it (cheap pegs will either fall off when you grab the tool, or jam and hold back the tool while you're pulling on it, or both!). Also, when each tool has a little drawing of itself behind, it's very hard to forget or lose a tool: you see on the pegboard that something is missing, and the little drawing tells you what exactly is missing.
Disadvantages. Horribly wasteful of space. Mobility disaster. Not scalable (i.e. when you run out of wall, you cannot add more tools). Difficult to hang heavy and/or bulky tools (metal vise, circular saw, etc.). Also, hard to adjust; if you buy one more screwdriver, or one more chisel, and you want to put that new tool in the logical place next to its siblings, you normally need to re-arrange all the tools on the pegboard, to make room for the new one. And don't even think of having one pegboard specialized for one task, and another pegboard a few hours later for another task, etc. Finally, because of their visual appeal, pegboards tend to attract "tool-worshippers" who accumulate tools they don't really need, just to gaze at them and fondle them and lick them... (I have fond memories of my Dad and I both ridiculing "tool-worshipping" while knowingly enjoying a bit of it together!)
Recently, I realized a pegboard might be ideal for a situation that is happening to me. I'm trying to help the Saint Zephyrin parish get a bit organized. They have a few tools (the building is very run down), but there is no centralized authority; people borrow tools willy-nilly, and sometimes bring them back. Often, duplicates are purchased by generous parishioners, because they think we don't have that tool, but it's just misplaced somewhere. A pegboard with pictures of objects could solve many problems: people would be easily able to scan visually to see if we have that tool, they would know where to put it back, and I could detect when a parishioner needed to be called to order. (You don't actually need pictures; you can just make an outline of the tool with a marker pen, or just write the name of the tool; also, you can make this outline elsewhere than on a pegboard, for example the outline of the vacuum cleaner on the floor of the closet, the outline and name of the container of bleach on a shelf, etc.)

[Source]
2.4) Operating Room Nurses and "Horizontal Pegboards". The only system faster than a pegboard for tool access is the surgical nurse with a "horizontal pegboard" (i.e. a table with all the tools layed out individually and precisely). The surgeon calls out the name of the tool he wants, holds out his hand, and the tool "magically" gets gently but firmly slapped into his hand, in the right orientation, ready to use. Of course, this is the best tool organization, that gives the best access. Also, there would be a lot to write about all the work this nurse has to do to make this method work: before the operation, she has to know what kind of operation will be done, she has to gather all the tools that will be needed for that specific operation, prepare them (sterilization, resplenishing consumables like sutures, bandages, etc.), then lay them all out on a table (i.e. on a "horizontal pegboard") in a logical way, so they will be easy to find, and so that the surgeon won't forget something inside the belly of the patient, because the nurse didn't know exactly what tools were supposed to be on her table at the end of the operation, etc.!
Advantages. Fastest access times, both for the surgeon and for the nurse.
Disadvantages. None whatsoever, apart from being very hard to find somebody who is willing to stand there in your workshop, for free, just to hand you your tools when you want them, not to mention the very long preparation times before every operation.

2.5) Bookshelves. What a beautiful example of organization! Bookshelves contain rectangular parallelepipeds (i.e. "book-shaped"), objects of varying thicknesses, heights, widths, all conveniently labelled, with the labels pointing all in the same direction (toward you, so you can read them). In a way, a tool chest is just a bookshelf turned sideways; you pull out the drawers you want, the way you pull out books.
Advantages. Access is very fast and easy: if you see a book you want, just grab it and pull! It can also be fairly space-efficient, if the bookshelves are adjustable. Books can be sorted by height, with all short books on the same shelf, tall books on another shelf, etc.
Disadvantages. Too bad all tools are not shaped like rectangular parallelepipeds!
So which method is the best? I don't know, but I suspect it depends a lot on the typical task you perform, your budget, the kinds of tools you need most often, where you perform your work, etc. I also suspect "the solution" will often be a mixture or hybrid of several of the methods outlined here above.
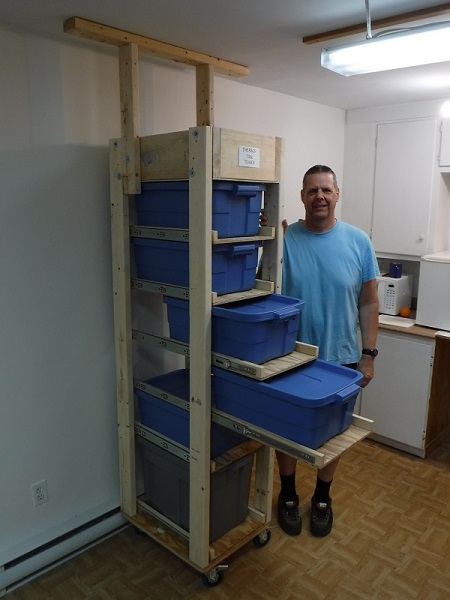
My current attempt at solving my perennial toolbox organization problem is the "Therblig Tool Tower":
- a tall piece of furniture for workshop storage;
- placed on a "dolly" (a separate plateform with casters) so it can easily be rolled around in the shop (the dolly can be used separately);
- containing several "side-less drawers" (i.e. shelves or trays) mounted on solid (rated at 90 pounds) full-extension ball-bearing sliders;
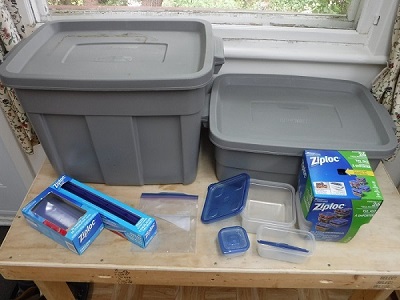
- each shelf supports a plastic box (currently "Rubbermaid Roughnecks®" because they are relatively inexpensive, strong, long-lasting, available in several sizes, stackable, dust-proof and rain-proof when the lid is snapped on, easy to clean because of the nice rounded internal corners, etc.), and the lid of that box is normally stored elsewhere (like on top of the tower) so you end up with an almost-normal drawer;
- each Roughneck contains a heap of tools and/or smaller plastic containers (themselves containing tools and or consumables for those tools);
- the smaller plastic containers are transparent, which eliminates the need for time-consuming labelling (the containing Roughnecks are not transparent, because as far as I know, transparent plastic quickly becomes brittle with age);
- the smaller containers are either rigid, or not (currently "Johnson Ziploc®" because their ziploc bags are easy to find, available in many sizes, etc.; in addition, I recently discovered the newer Ziploc small rigid food-grade containers, and I like them, because they are rectangular parallelepipeds (sort of) which saves space, available in many sizes, nestable, with lids that don't easily pop off, etc.). Pastic bags are nice because they conform, so they waste less space in storage. Plastic boxes waste space, but their contents are better protected, and tend to be accessible faster.
(And no, I'm not paid by Rubbermaid or Johnson! I just like some of their products.)
Some advantages of this toolbox organisation method are:
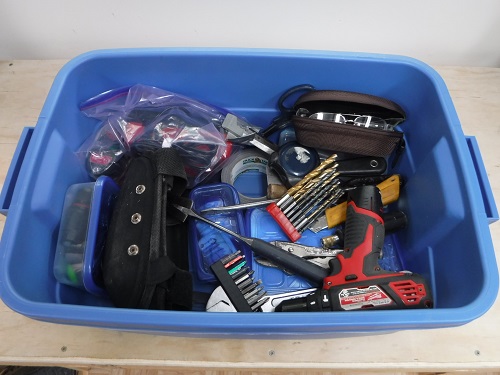
3.1) Tool Accessibility: Of course, access times are slower than pegboards or surgical nurses, but better than a pure heap. Moreover, access times can be fairly easily adjusted, according to need. Seldom-used items are just placed in jam-packed Roughnecks, stacked on the floor in a corner far away, with the least-often used Roughneck at the bottom of the stack. If they are used a bit more frequently, that stack of Roughnecks is "promoted" to sitting on a dolly alone (no corresponding tower). More often still? Dolly and Therblig tower. More often still? Swap "drawers" around so the Roughneck containing the tools used more often is just at the right height, and the tools used less often are either toward the top or the bottom of the tower. Also, swapping individual tools, here again putting a tool used very often into a more accessible Roughneck. More often still? Reduce the "fill rate" of the Roughneck in which those tools are stored, so desired objects are more often "on top", without needing to rummage around (and inside each Roughneck, objects can be moved from flexible Ziplocs to rigid Ziplocs, or taken out of Ziplocs and left as is in the Roughneck). More often still? Start laying out those tools on the workbench, like a surgical nurse preparing for an operation.
3.2) Mobility: Not only can the tower (or plain stacks of Roughnecks on a dolly) be rolled around close to the work, but any Roughneck can be removed from the tower, closed with its lid, and taken away like a normal toolbox. (Yes, carrying a Roughneck requires two hands, whereas a real toolbox requires only one, but in my experience this disadvantage isn't so bad.) And Roughnecks with their lids protect their contents in the rain and snow, which is useful in real-life situations where you often need to briefly "abandon" something outside to go put out a fire somewhere else. Also, the whole tool tower is fairly easy to disassemble so it can be packed in a moving truck.
3.3) Scalability: Workshops are not museums. Sometimes you borrow or rent tools for a specific job, sometimes you get rid of tools you're not going to use often enough anymore, and sometimes you buy more tools. So the set of tools in your workshop needs to be able to shrink and expand fairly easily. This can be accomplished by adding Roughnecks, dollies, towers and Ziplocs (and by modifying the "fill-rate" of those containers). Of course, this requires intelligence and moral virtue. Often, you don't need more Roughnecks or Therblig Tool Towers, you just need to get rid of junk!
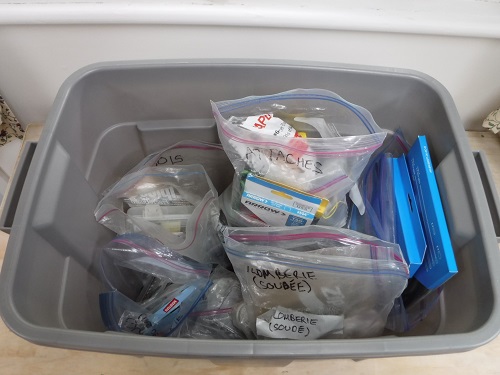
3.4) Cost: Roughnecks are expensive, but compared to almost all the toolboxes sold in hardware stores these days, they are the least expensive (while being more practical, in my opinion). The longest heavy-duty full-extension ball-bearing drawer sliders I could find (22", made by "Nektra", purchased at Canac-Marquis) are 6$ each, which I find very inexpensive: Imagine, 6 strong steel bars (each slider has three), ball bearings (which are precision metal parts), all this assembled and shipped from halfway around the world (China), and they are almost the same price as one bloody 2x4 piece of lumber eight feet long, which grows for free in any forest nearby! Plywood is always expensive, but the dimensions of the shelves tend to reduce waste in a standard 4x8 foot sheet. The whole assembly process might not be trivial, but it's close to the simplest you can get for a tower of drawers. With a few simple tools, a cordless drill, and a circular saw with cutting guide, you can build one in less than a day. Finally, the Ziploc rigid food-grade containers are some of the least-expensive small containers available (much less expensive than "Plano" boxes used by fishermen, also various containers for children's school lunches, etc.)
3.5) Safety: If you look in the picture at the top of the page, you see a "crash bar" at the top of the tower. This bar must be ajusted to leave just a bit of space between it and the ceiling. If the tower begins to tip over, the crash bar should stop it. Of course, it depends on your ceiling, but a handyman should be able to figure out where the ceiling beams are, and position the crash bar so it will safely jam against those beams, and not just plow through the weak plasterboard. If I had some kind of workplace open to the public, I would fear lawsuits and include "crash bars" on all my towers.
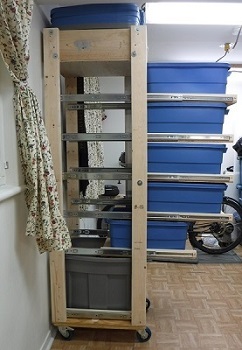
Look at the picture above. All drawers are filled with heavy tools, and almost all of them are pulled out. It's at the tipping point as is, pull something out a little bit more, and the tower falls over. Since I'm the only one using it, and I only open one drawer at a time, and even with almost all the drawers out it's still OK, I don't use "crash bars" on mine.
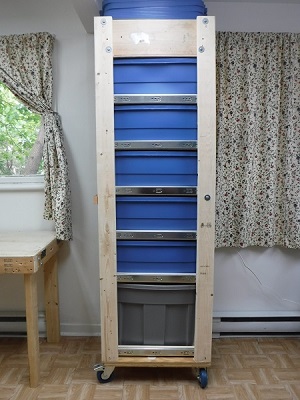
Side view.
Bill Of Materials:
- Wood: 8-foot long 2x4s, untreated (qty: 4. Please, for your own good, these 2x4s have to be very straight and very dry, since the delicate distance between ball-bearing sliders will depend on them); sheet of 0.5" plywood, good one side; 8-foot long 2x8, untreated; small piece of 0.25" plywood (19x16") for the "torsion box"; small piece of 0.75" plywood (19x16") for the dolly; 8-foot long 1x2" select pinwood for drawer sides (qty: 3).
- Hardware: hex bolts, 0.25" diameter (qty: 8); T-nuts, 0.25" diameter (qty: 8); large washers (I.D. 0.25", O.D. 1.25"; qty: 8); 3" deck screws (qty: 20); 1.25" deck screws (qty: 140); spherical head metal screws 0.75" long, size #8 (qty: 42); 4" heavy-duty caster wheels (qty: 4); screws to hold caster wheels, spherical head metal screws 0.75" long, size #12 (qty: 16); heavy-duty full-extension ball-bearing drawer sliders (qty: 7 pairs); 18" long soft steel rods of 3/16" diameter (qty: 4).
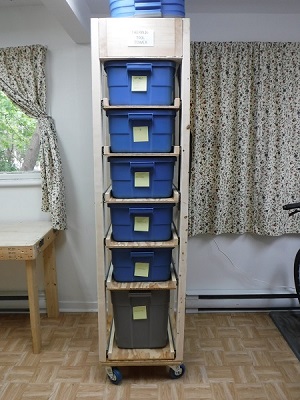
Front view.
"Torsion box":
At the top of the tower, you have a sort of "torsion box" (it's not a real torsion box), which provides most of the rigidity for the whole tower. This part wastes a lot of space, which is why it's on top and not the bottom, because the bottom is precious space for heavy Roughnecks. The higher you go, the less accessible things become. Also, real torsion boxes are closed top and bottom, but this one is open from the top, because it gives a bit more storage space that way, and doesn't hurt rigidity that much.
Dimensions: you're aiming for a box 24" deep by 16" wide. So 2 lengths of 2x8 of 24", and 2 at 1/8 less than 13" (once assembled, it seems to work out to 16" wide). Just screw and glue the 4 pieces of 2x8 and the thin plywood at the bottom, making sure everything is nice and rectangular. (Easier said than done!)
Bottom plate:
Just 0.5" plywood, 24" deep by 19" wide (well, you're aiming for 16" between the 2x4 risers).
Risers:
Four 2x4s, 6 feet long. I chose that height for the tower because I wanted it to roll under normal door openings, which are about 80" high. The dolly is 6" high, the bottom plate is 0.5", so that gives 72+6+0.5 = 78.5", which is pretty close to 80 (and my doors have trimmings which make the opening less than 80", so I had to be careful). Also, by sheer dumb luck, it leaves barely enough space for five small Roughnecks and one big one. Of course, if you have no doors in your shop, and want taller Roughnecks, etc., you can easily play with the length of those four risers.
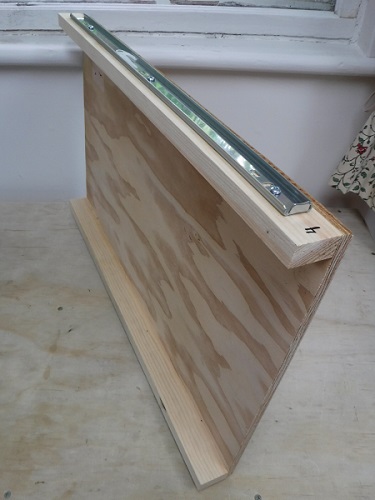
Shelves (or sideless drawer bottoms):
Two 24" lengths of 1x2" for the sides, on which you screw the small side of the ball-bearing sliders. Actual bottom of the shelf is a piece of 0.5" plywood (0.25" is too mushy to hold heavy Roughnecks, 0.75" was too strong and took away critical height). The width of that piece of plywood is tricky. You need to fit inside the 16" between 2x4 risers, but you have two thicknesses of steel sliders to accomodate. You don't want the sliders to bind, but you don't want them to splay out either. I used 14 inches and 13/16" (about 377mm). You can glue the plywood to the 1x2" sides, if you really are sure about the total width. I was scared and just used 12 screws per shelf, in case the sliders jammed and I needed to vary the width a bit. Also, I used good-one-side plywood, and put the sanded side up. Not a necessity, but looks nicer.
"Anti-splay" bars:
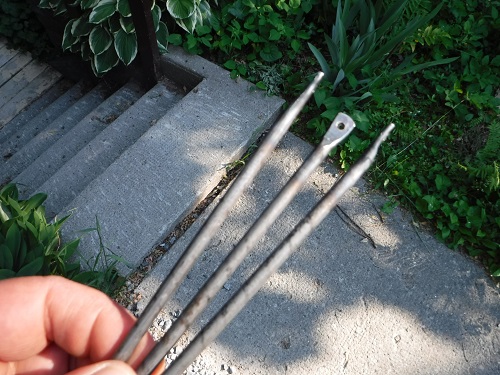
The distance between the 2x4 risers on which all the shelves are hung is critical: the ball-bearing sliders have a 100-pound rating for forces going down (i.e. the weight of the drawer being pulled down by gravity), but almost no resistance to sideways pulling. Moreover, according to my quickie experiments, the 2x4 risers, especially the front ones, tend to splay out when heavy drawers are pulled out. So something must keep that width between the 2x4 risers as constant as possible.
Moreover, there isn't much room for reinforcements, especially at the front. This is where the drawers come out, so if you put nice big plywood reinforcements for example, the drawers will be blocked! The least bad solution I've found is "anti-splay" bars, 3/16" diameter soft steel rods with flattened and drilled ends. (I just heated the ends until they were red, with a MAP gas plumber's torch, then bashed them flat as best I could.)
Installing the shelves:
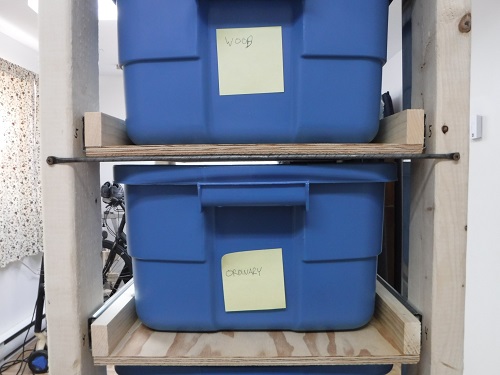
How do you measure everything precisely so all the shelves fit perfectly in a very limited height? No idea. I just used "Polish Engineering", i.e. adding shelves one after the other until I ran out of place. Here is the method I used:
- We assume the tower itself is built (torsion box, risers and bottom plate), but no
shelves and no anti-splay bars are installed.
- We also assume each shelf is assembled, at least partially. In other words, for
each shelf, the two longerons are screwed or glued (I preferred screwed, since
I was afraid of making mistakes and I wanted to be able to reajust the critical
distance between the pair of sliders) to the plywood bottom of the shelf, and
the ball-bearing sliders are screwed to the longerons.
- Flip the tower upside down. This means you'll be adding shelves from the top
(i.e. where the "torsion box" is) to the bottom plate.
- (Anecdote: I was planning on adding shelves willy-nilly, and leaving some wasted
space between the before-last shelf and the last one, but as it turns out, I got
lucky and the last shelf to be installed was also perfectly sized for a tall
Roughneck. Talk about sheer dumb luck!)
- Before adding a shelf, always lay a scrap piece of 0.25" thick plywood down
before, so the drawer will have some space to move in and out. Then, add a
complete Roughneck (of the height you want), with its lid on. Then, and only
then, lay an actual shelf on this pile (upside down, of course).
- Now is the fun part for each shelf: actually securing the sliders to the 2x4
risers, at the right height. It's pretty fool-proof, since you can see where
those sliders need to be screwed in (the hard part is fidgeting around to note
where the screwes have to go, so that the end result will be a slider that is
exactly there, where you can see it now). My silly method was to
slide out the sliders a bit at the back, then screw them onto the 2x4 risers, then
after supporting the sliders at the front temporarily with two bar clamps (to note the
precise height where I needed to screw them), removing the shelf by pushing down on
those tabs on the inside of the sliders, which leaves two of the three sliding parts of
the slider in place, which you can then screw to the front 2x4 riser.
- At regular intervals (in my case, every two drawers), add an "anti-splay" bar,
front and back. Don't do like me. Carefully measure the correct distance you want
to maintain between those 2x4 risers, and use those bars to keep it that way, instead
of adding the bars after you finished the tower and realized the 2x4s were not
rigid enough witdth-wise...
Don't hesitate to be a bit more careful for that part of the construction process, because the smoothness of the drawers gliding in and out depends a lot on the perfect alignment of everything you're installing.
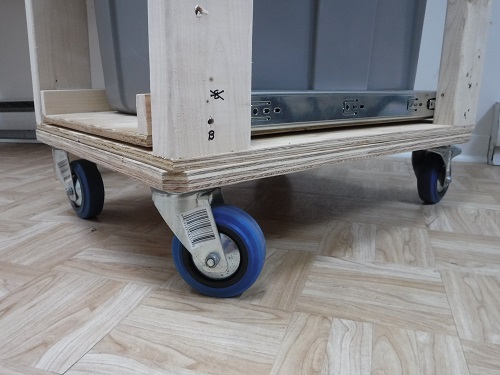
Dolly:
Not much to say. 24x19", 4 heavy-duty casters at the corners.
Sanding? Painting?
I guess you could make the tool tower a bit more socially acceptable with some sanding and painting. I prefer the "heman-cave" look of raw lumber.
Would I do things differently if I built another one? Probably. Are there problems I have not solved yet? Of course. Here are some thoughts for the next version:
5.1) Labels on Roughnecks? I'm still trying to figure out how to do this. Currently, I'd bet on writing a large permanent number on each box, while also providing some kind of plastic pocket in which to slip a color picture of the box's contents (not a raw picture seen from the top of the box, but an arranged picture, with the contents all layed out and visible). I could therefore have a spreadsheet with a list of all my tools, and be able to note in which box they go with just one number, but another worker unfamiliar with my setup could look at the picture and (hopefully) figure out what is inside without too much difficulty. Moreover, the picture could be updated without too much difficulty. And if the Roughneck contains a lot of boring stuff that doesn't need to be tracked precisely (like screws, bolts, various raw material, etc.), just use a simplified picture showing a few representative items. Avoiding written labels not only saves time, but also avoids the mental contorsions caused by the method of organization. The more you follow a "most-recently-used" approach, keeping tools most often accessed in the closest boxes, the more "illogical" the content of a box becomes. Instead of a container logically having all your wrenches, or all your screwdrivers, or all your chisels, you might end up with one small chisel, a bottle of oil, a tenon saw and your shop slippers (for cold feet in the Winter!). Finding a meaningful English label for such bizarre groups of objets is not easy, but color pictures have no problems.
5.2) Disassembly for moving? Currently, the drawers are easy to remove (the ball-bearing sliders have little tabs that allow removal), and the four 2x4 risers are easy to remove from the "torsion box" at the top, but it's still messy to remove the bottom plate from the 2x4 risers, and even messier to remove the sliders from the 2x4 risers.
5.1) Construction of the shelves. Would it be simpler to just use thicker plywood and screw the sliders directly on the plywood, instead of on 1x2" which themselves are screwed on the sliders? I don't know.
5.3) Wasted space in front and in back of each Roughneck. The overall length of a Roughneck is 24" (hence the size of the tower shelves), but a lot of that length is for the handles, and also in order to be stackable the Roughnecks get much smaller from top to bottom. So you end up with annoying wasted space. You could make the whole tower less than 24", and have the Roughneck handles stick out. I decided to keep it at 24", because: (i) wastes less plywood when cutting from 4x8 foot sheet goods; (ii) I don't want to be married to Roughnecks. If someday they are discontinued, or I decide to make my own boxes, the replacement boxes might have slightly different dimensions. If I could make my own boxes, almost all wasted space would dissappear (but no matter how hard I tried, I could not think of a box I could make myself, that would be as light and inexpensive as a Roughneck).
5.4) Thin plywood sides and back? You could want to prevent dust from entering, and adding some thin material (plywood or even tyvek wrap, etc.) all around to make a proper casing. I just thought the existing design was already very expensive and complicated and hard to disassemble for moving, and lids on boxes can protect against dust if it's that bad. I also thought of putting a bit of plywood at the back, to give more rigidity against side-to-side motion. But informal shake tests seem to indicate that the big torsion box at the top is doing a fairly good job, and the more you add stuff, the more complicated it becomes to disassemble for moving. So I'm a bit wary about "adding rigidity" unless it's really necessary.
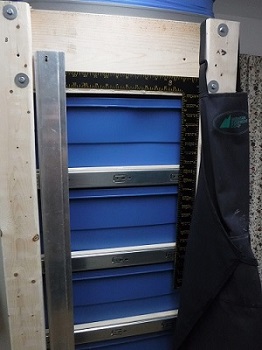
5.5) Parasites. I didn't plan on it, but very quickly "parasites" appeared on the tower, because some tools are so bloody long and flat and fragile that I don't really know where to store them. Already I hang my framing square and my circular saw guide along the side (since it's a bit protected in the "dead space" between the two 2x4 risers). Then, since my eyes are getting old and I often need a magnifying lamp, why not stick it there? I can now roll it to where I need it. And since it's often required to plug electrical stuff in close to a workbench, why not put the surge suppressor on the tower?
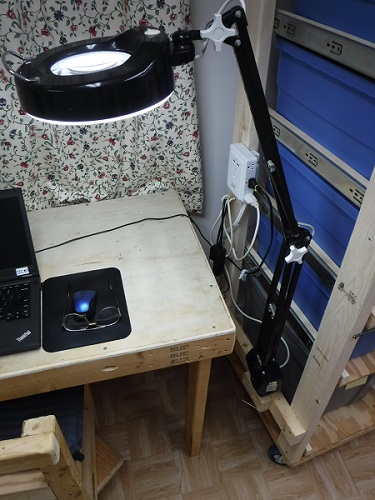
More barnacles: magnifying lamp and voltage surge protector.
5.6) Adjustable feet. As soon as I decided to put the tower in another place in my appartment, I realized that just as a hammer can also be called a "thumb detector", a tall and slender tower resting on a floor can also be called an "unlevel-floor detector". The height of the tower exaggerates any slope. First I shimmed under the wheels of the dolly, but that made moving the tower hard (I had to pry up the tower, remove the scraps of plywood compensating for the horribly crooked floor in that corner of the room, then I could roll it away). So I just got four carriage bolts (I think 5/16" diameter by about 3" in length) with "T-nuts", made four holes, banged them into the tower's base (lined up with the 2x4s that hold everything up, of course), and carved out little depressions in the dolly so the tower itself would not have a tendency to move relative to the dolly, and voilą! Just put the tower on the dolly, roll to its destination, and fiddle around a bit with a level and a wrench.
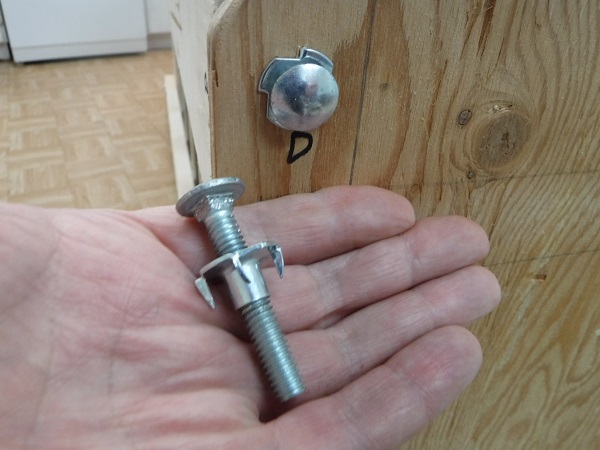
Improvised adjustable feet.
Let's Adore Jesus-Eucharist! | Home >> Varia >> Bachelor's Kit